Subscriber Exclusive
Pick up and Knit: The Difference Is in the Details
The secret to clean edges and smooth joins isn’t complicated—it’s consistent, well-spaced picked-up stitches.
The secret to clean edges and smooth joins isn’t complicated—it’s consistent, well-spaced picked-up stitches. <a href="https://farmfiberknits.com/pick-up-and-knit-the-difference-is-in-the-details/">Continue reading.</a>
https://farmfiberknits.com/cdn-cgi/image/format=auto/https://www.datocms-assets.com/101500/1777060997-swansen-blanket-or-shawl.jpg?auto=format&w=900
Once you begin knitting more than scarves and hats, you soon encounter the following phrase: pick up and knit. Whether you’re adding the button band to a cardigan, adding sleeves to a drop shoulder pullover, or adding a decorative border to a wrap, picking up and knitting stitches evenly and consistently is key to a polished result.
We’ll look at picking up and knitting stitches in the edges of both stockinette stitch and garter stitch. We’ve used a contrasting color for picking up stitches on our samples so it’s easier to see.
 Sandi knit a series of swatches to illustrate different selvedges for picking up stitches. All swatches were knit with Baa Ram Ewe’s Pip Colourwork, a 2-ply fingering-weight yarn spun from 100% British wool.
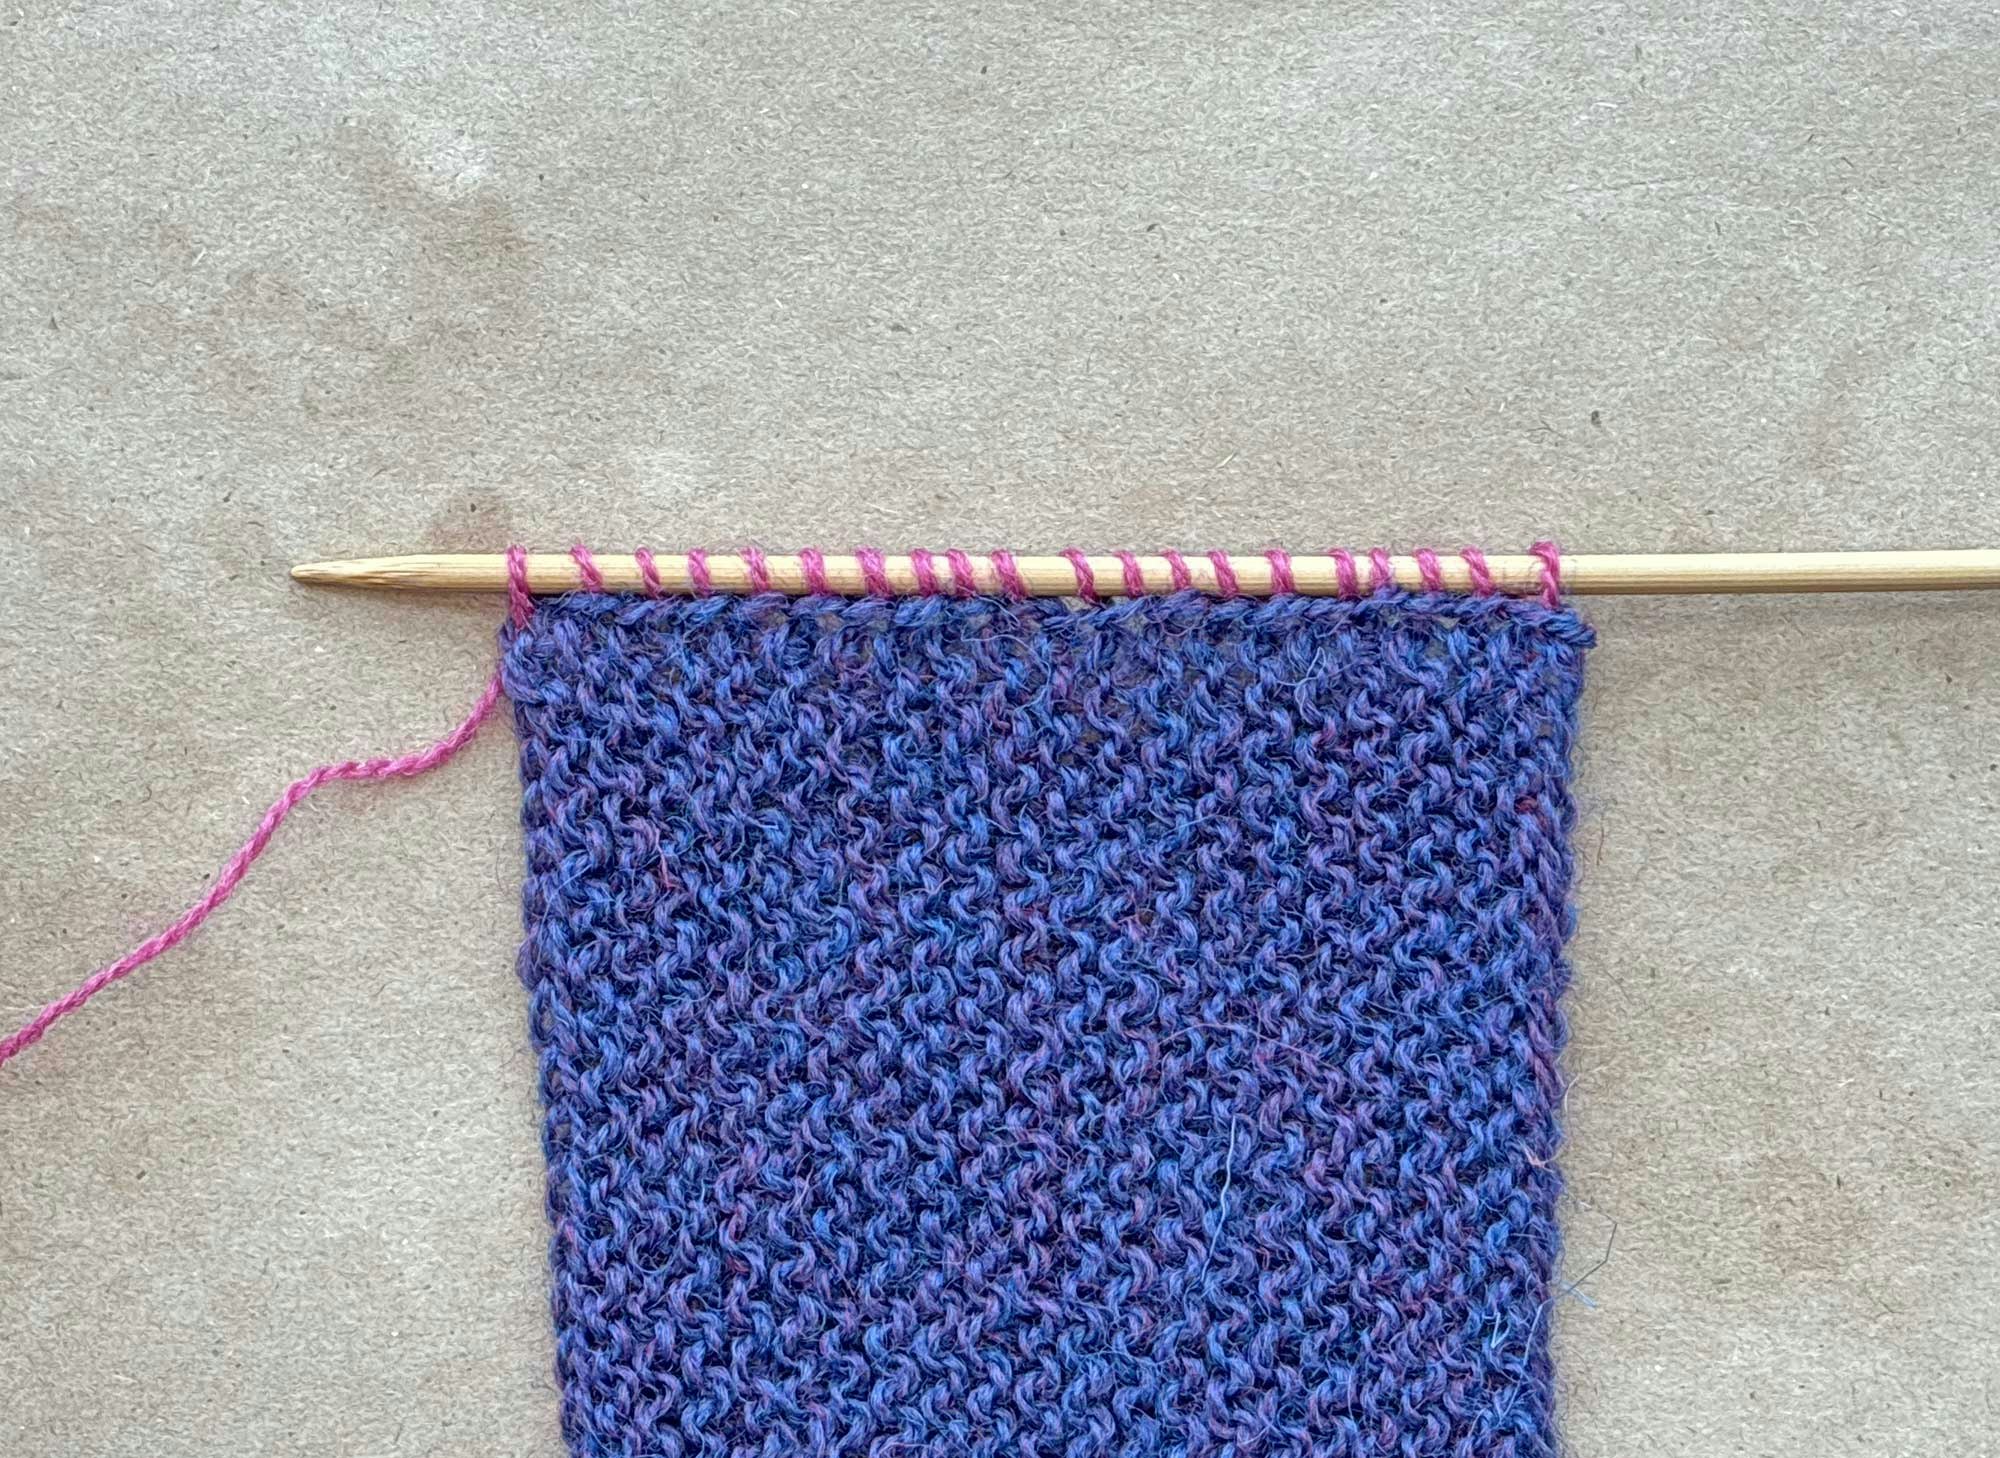
Spacing the Stitches
In determining how to space your new stitches, let the gauge be your guide. For our stockinette stitch swatch, the gauge is 24 sts and 32 rows = 4", or 6 sts and 8 rows = 1". When we pick up and knit stitches along the side edge, we’ll pick up 6 stitches for every 8 rows. Stated another way, we’ll pick up a stitch in three consecutive rows, then skip the fourth row.
Garter stitch usually has a gauge equivalent to 1 stitch for every 2 rows. Since 2 rows make 1 garter ridge, simply pick up and knit 1 stitch for each ridge.
If your pattern specifies the number of stitches to be picked up and knit along an edge, using the gauge as your guide should get you very close. If you find your stitch count is off by a few stitches, just sprinkle a few increases or decreases evenly across the next row to adjust the total stitch count.
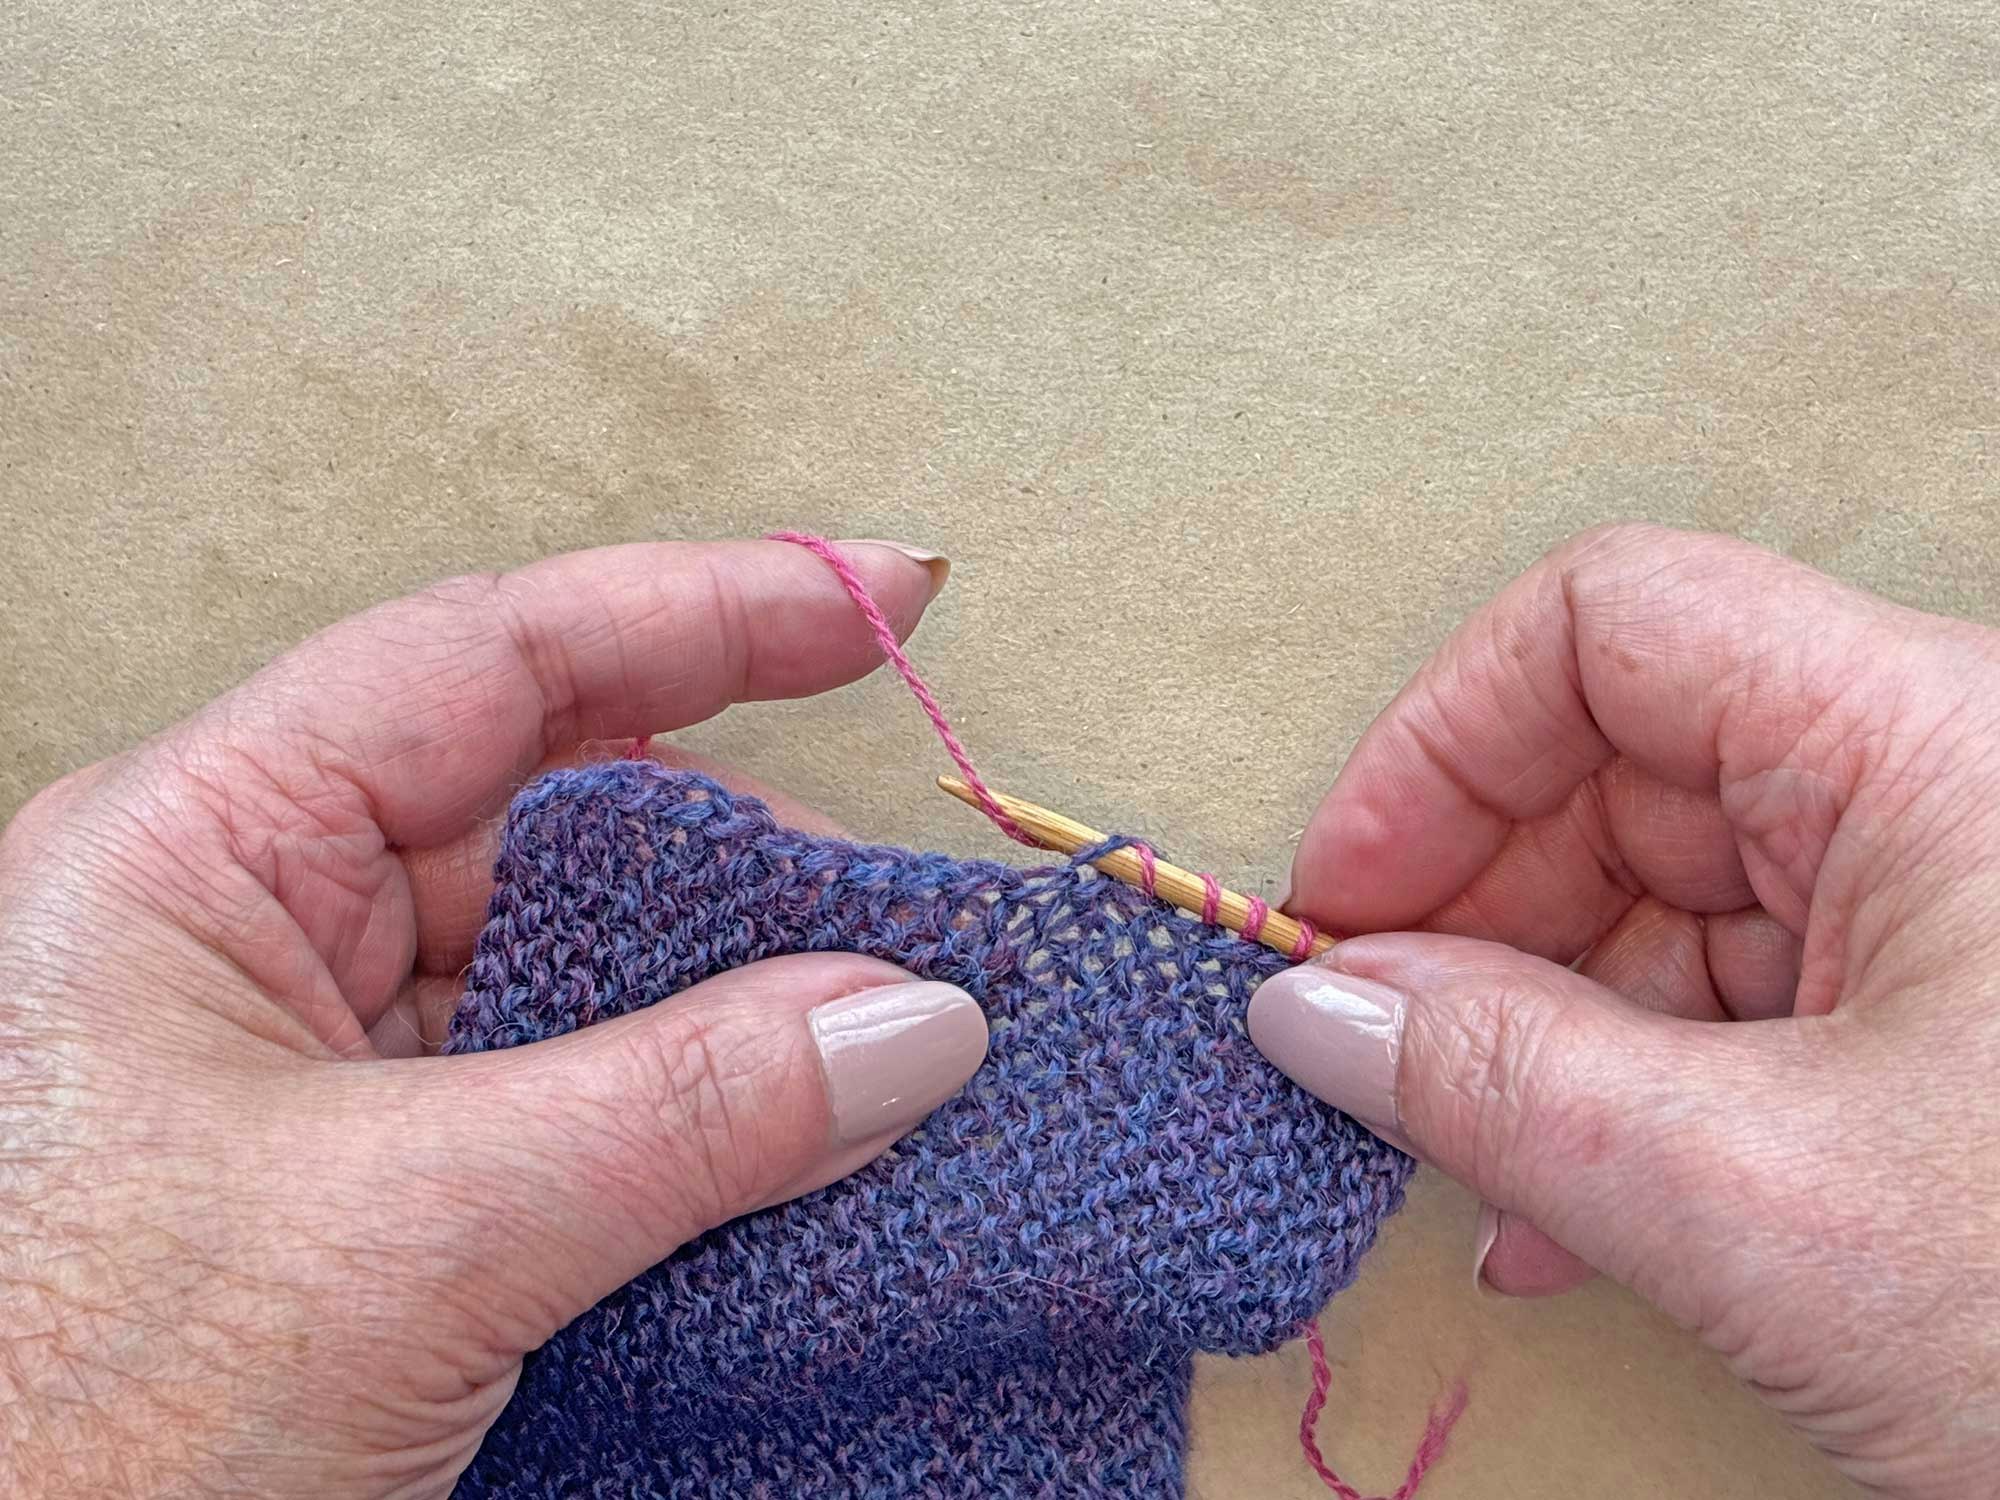
Picking Up on Stockinette Stitch
On stockinette stitch, pick up and knit stitches in the space between the first and second column of stitches.
SUBSCRIBER EXCLUSIVE
Once you begin knitting more than scarves and hats, you soon encounter the following phrase: pick up and knit. Whether you’re adding the button band to a cardigan, adding sleeves to a drop shoulder pullover, or adding a decorative border to a wrap, picking up and knitting stitches evenly and consistently is key to a polished result.
We’ll look at picking up and knitting stitches in the edges of both stockinette stitch and garter stitch. We’ve used a contrasting color for picking up stitches on our samples so it’s easier to see.
Sandi knit a series of swatches to illustrate different selvedges for picking up stitches. All swatches were knit with Baa Ram Ewe’s Pip Colourwork, a 2-ply fingering-weight yarn spun from 100% British wool.
Spacing the Stitches
In determining how to space your new stitches, let the gauge be your guide. For our stockinette stitch swatch, the gauge is 24 sts and 32 rows = 4", or 6 sts and 8 rows = 1". When we pick up and knit stitches along the side edge, we’ll pick up 6 stitches for every 8 rows. Stated another way, we’ll pick up a stitch in three consecutive rows, then skip the fourth row.
Garter stitch usually has a gauge equivalent to 1 stitch for every 2 rows. Since 2 rows make 1 garter ridge, simply pick up and knit 1 stitch for each ridge.
If your pattern specifies the number of stitches to be picked up and knit along an edge, using the gauge as your guide should get you very close. If you find your stitch count is off by a few stitches, just sprinkle a few increases or decreases evenly across the next row to adjust the total stitch count.
Picking Up on Stockinette Stitch
On stockinette stitch, pick up and knit stitches in the space between the first and second column of stitches.[PAYWALL]
Click on any image to open in full-screen mode and to learn more.
Of course, the edges of stockinette stitch have a strong tendency to roll toward the purl side of the fabric. Use your fingers to unroll that edge completely until you can see the column of stitches at the very edge. Don’t be shy about stretching the piece if that helps you identify the space between that first column of stitches and its neighbor. Insert your needle into that space from front to back, wrap the yarn around your needle, and pull the new stitch through to the front.
Picking Up on Garter Stitch
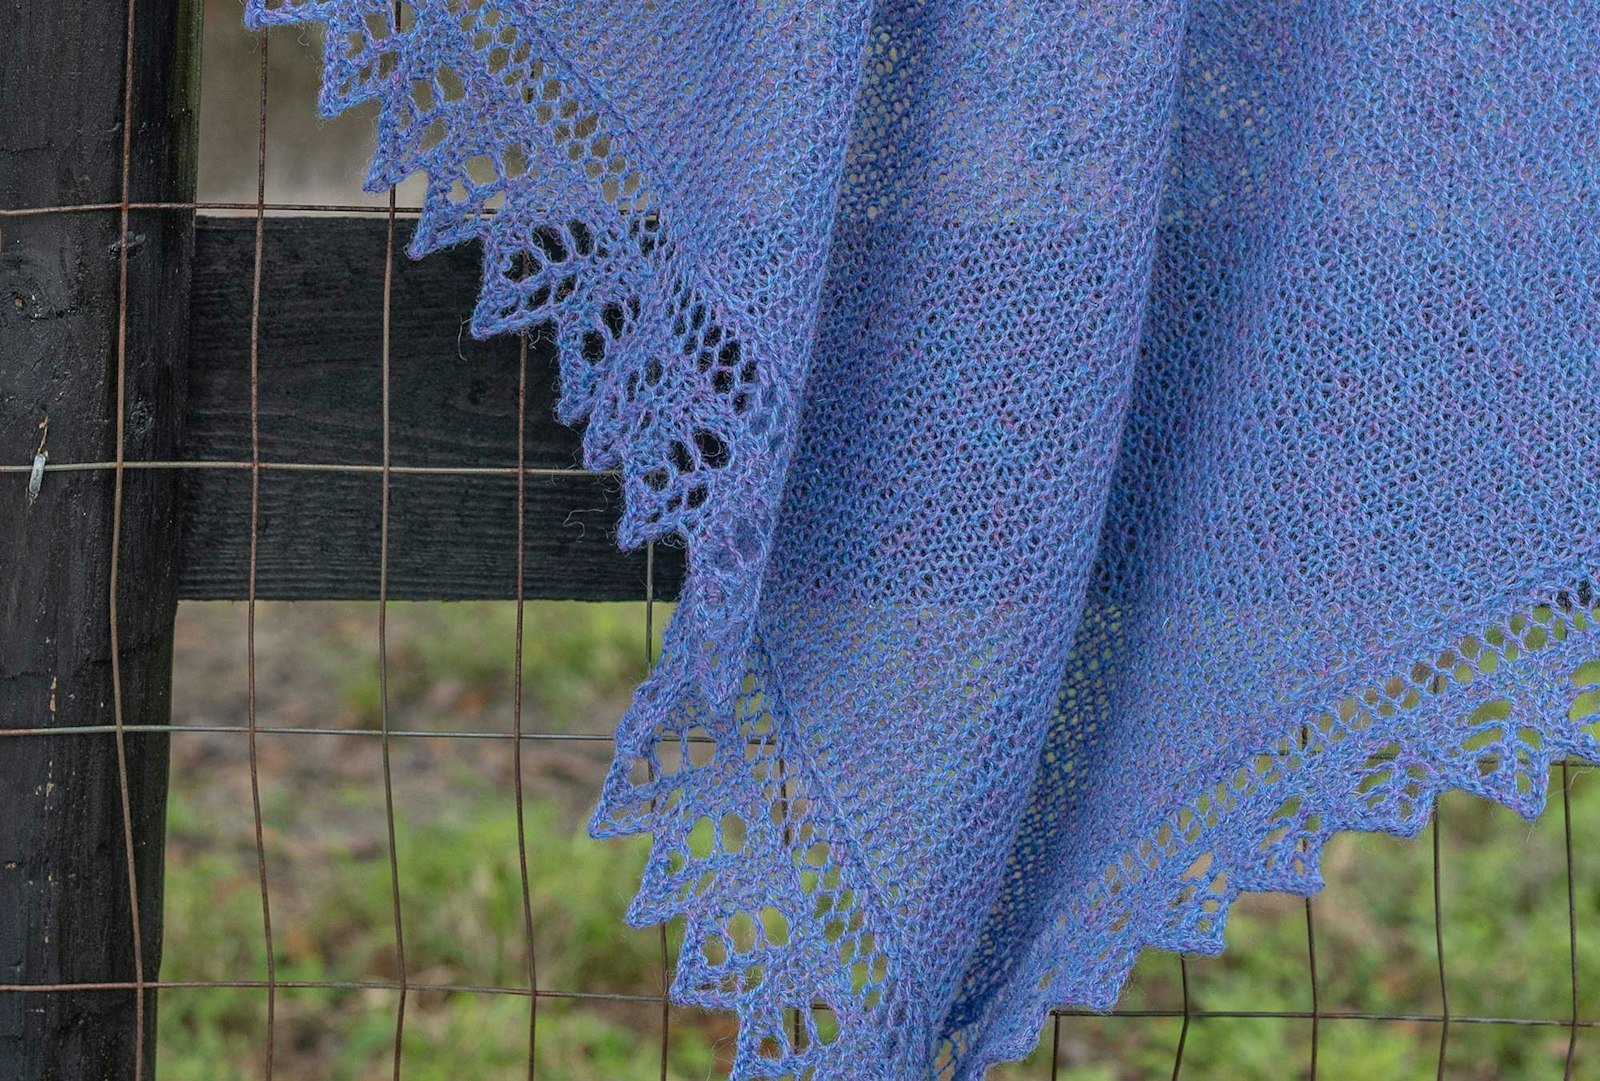
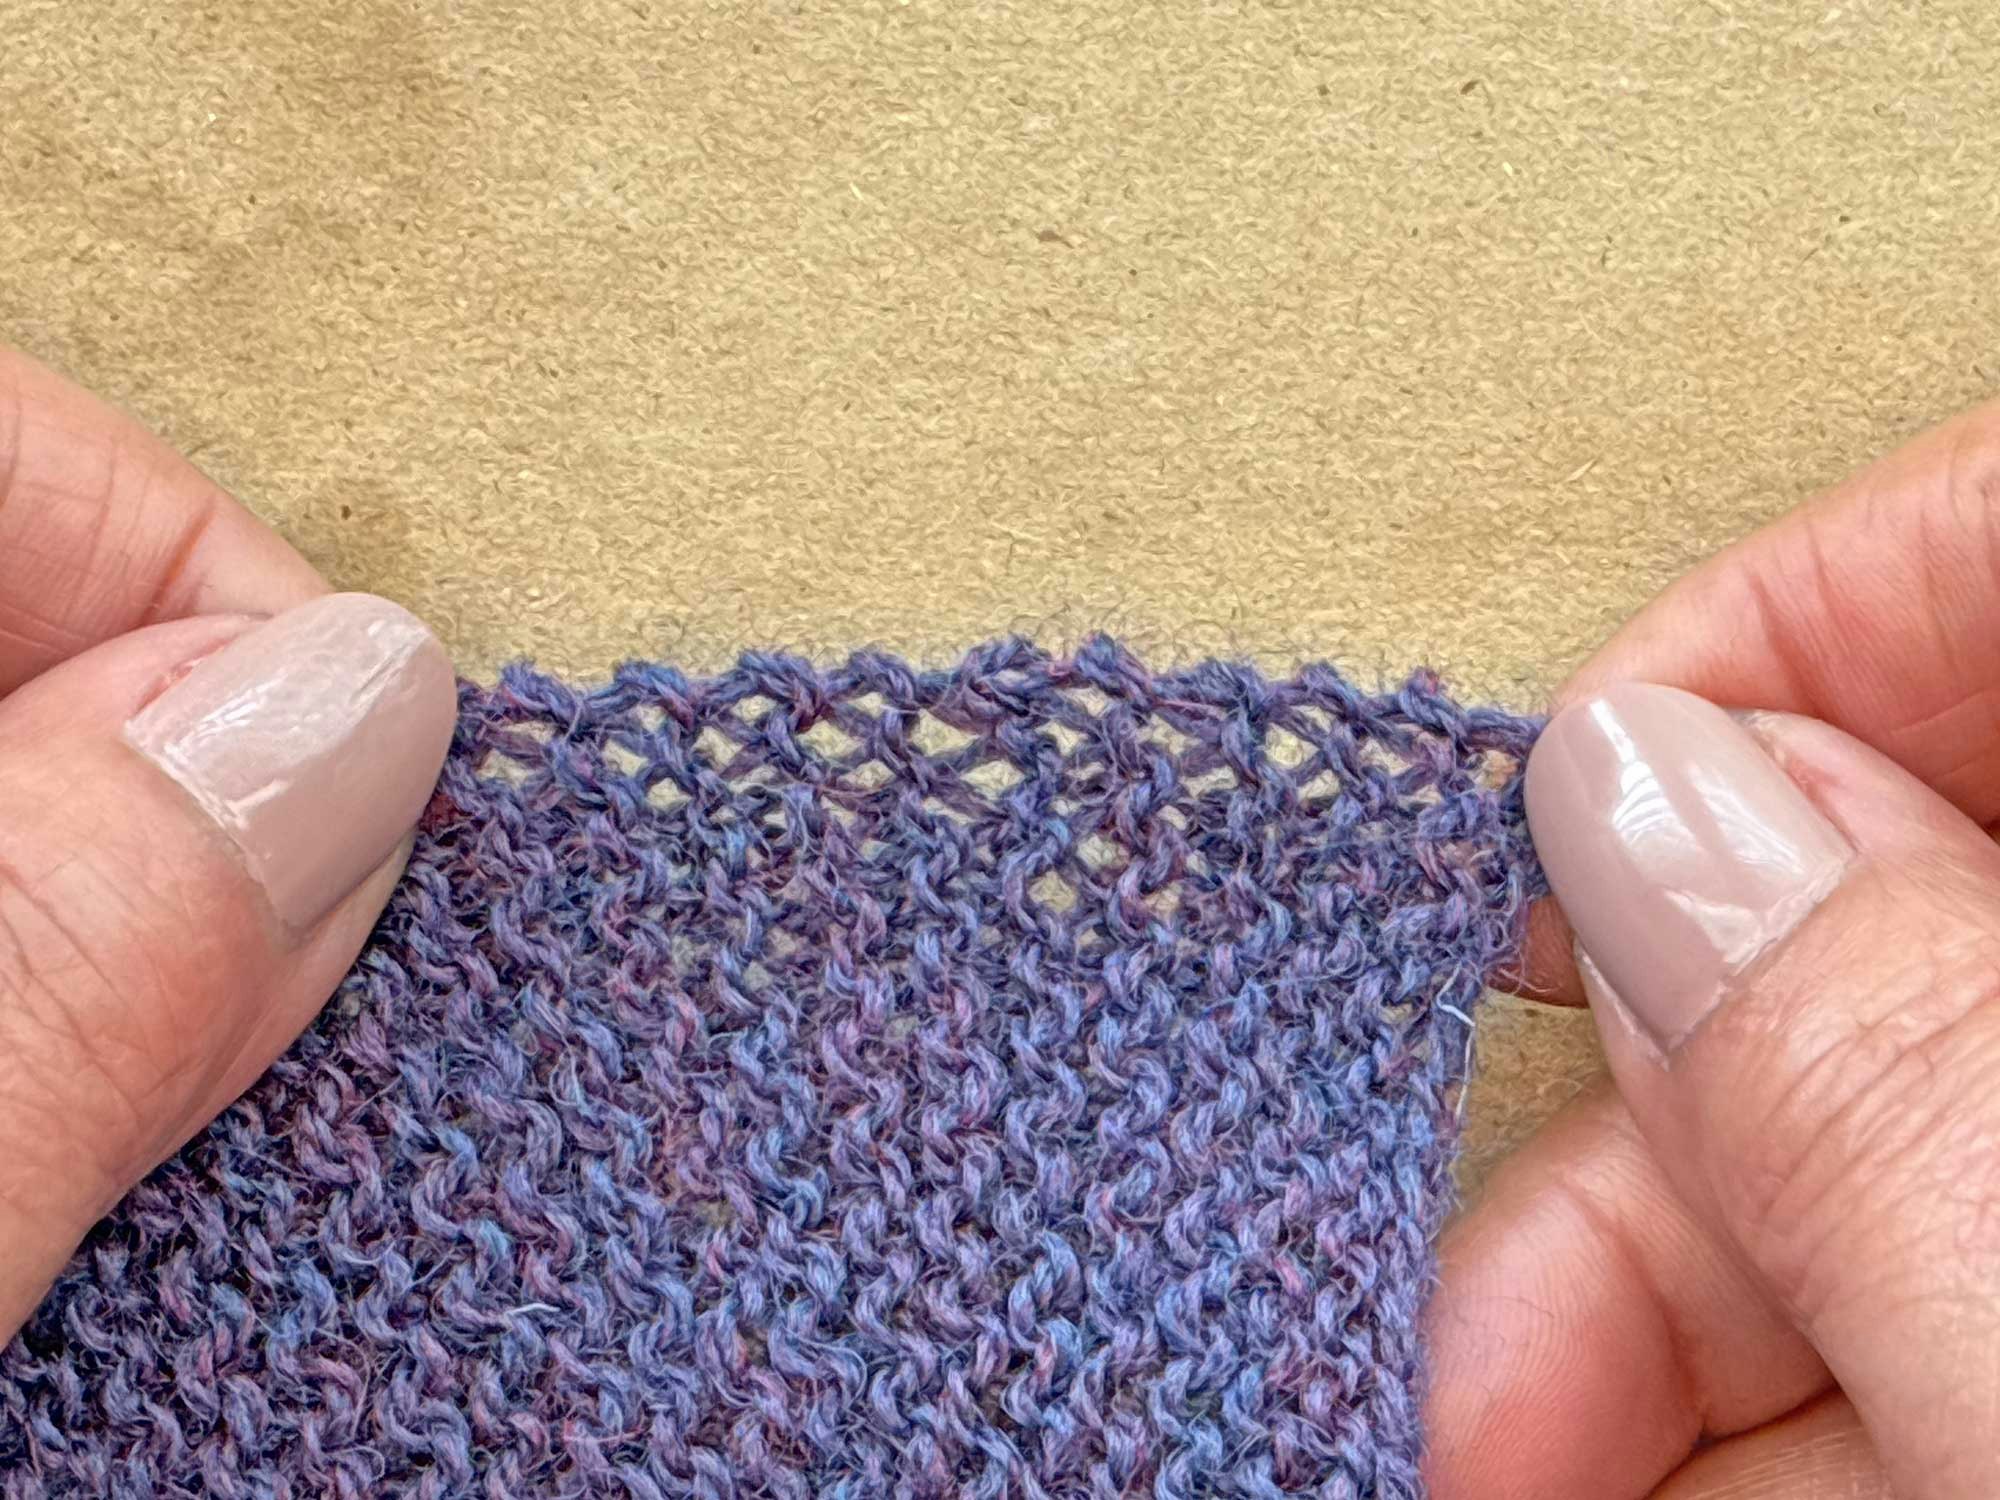
Meg Swansen’s Lace-Edged Blanket or Shawl design in the Summer 2026 issue of Farm & Fiber Knits starts with a clever square of garter stitch. All four edges of the square are side edges (I told you it was clever!). You then pick up and knit stitches around the perimeter of the shawl for a lace edging.
 A close-up of the join between the body and the border of Meg‘s blanket/shawl.
Meg suggests two selvedge edge options you can use when knitting the garter stitch square. You can slip the first stitch knitwise with yarn in back, which will produce a bump or “knot” at the end of each garter ridge. Or you can slip the first stitch purlwise with yarn in front to produce a tidy chain along the edge. Either one is fine but use the same selvedge edge consistently throughout your project.
The selvedge edge you choose will make a subtle difference in the appearance of your lace edging. Let’s take a closer look.
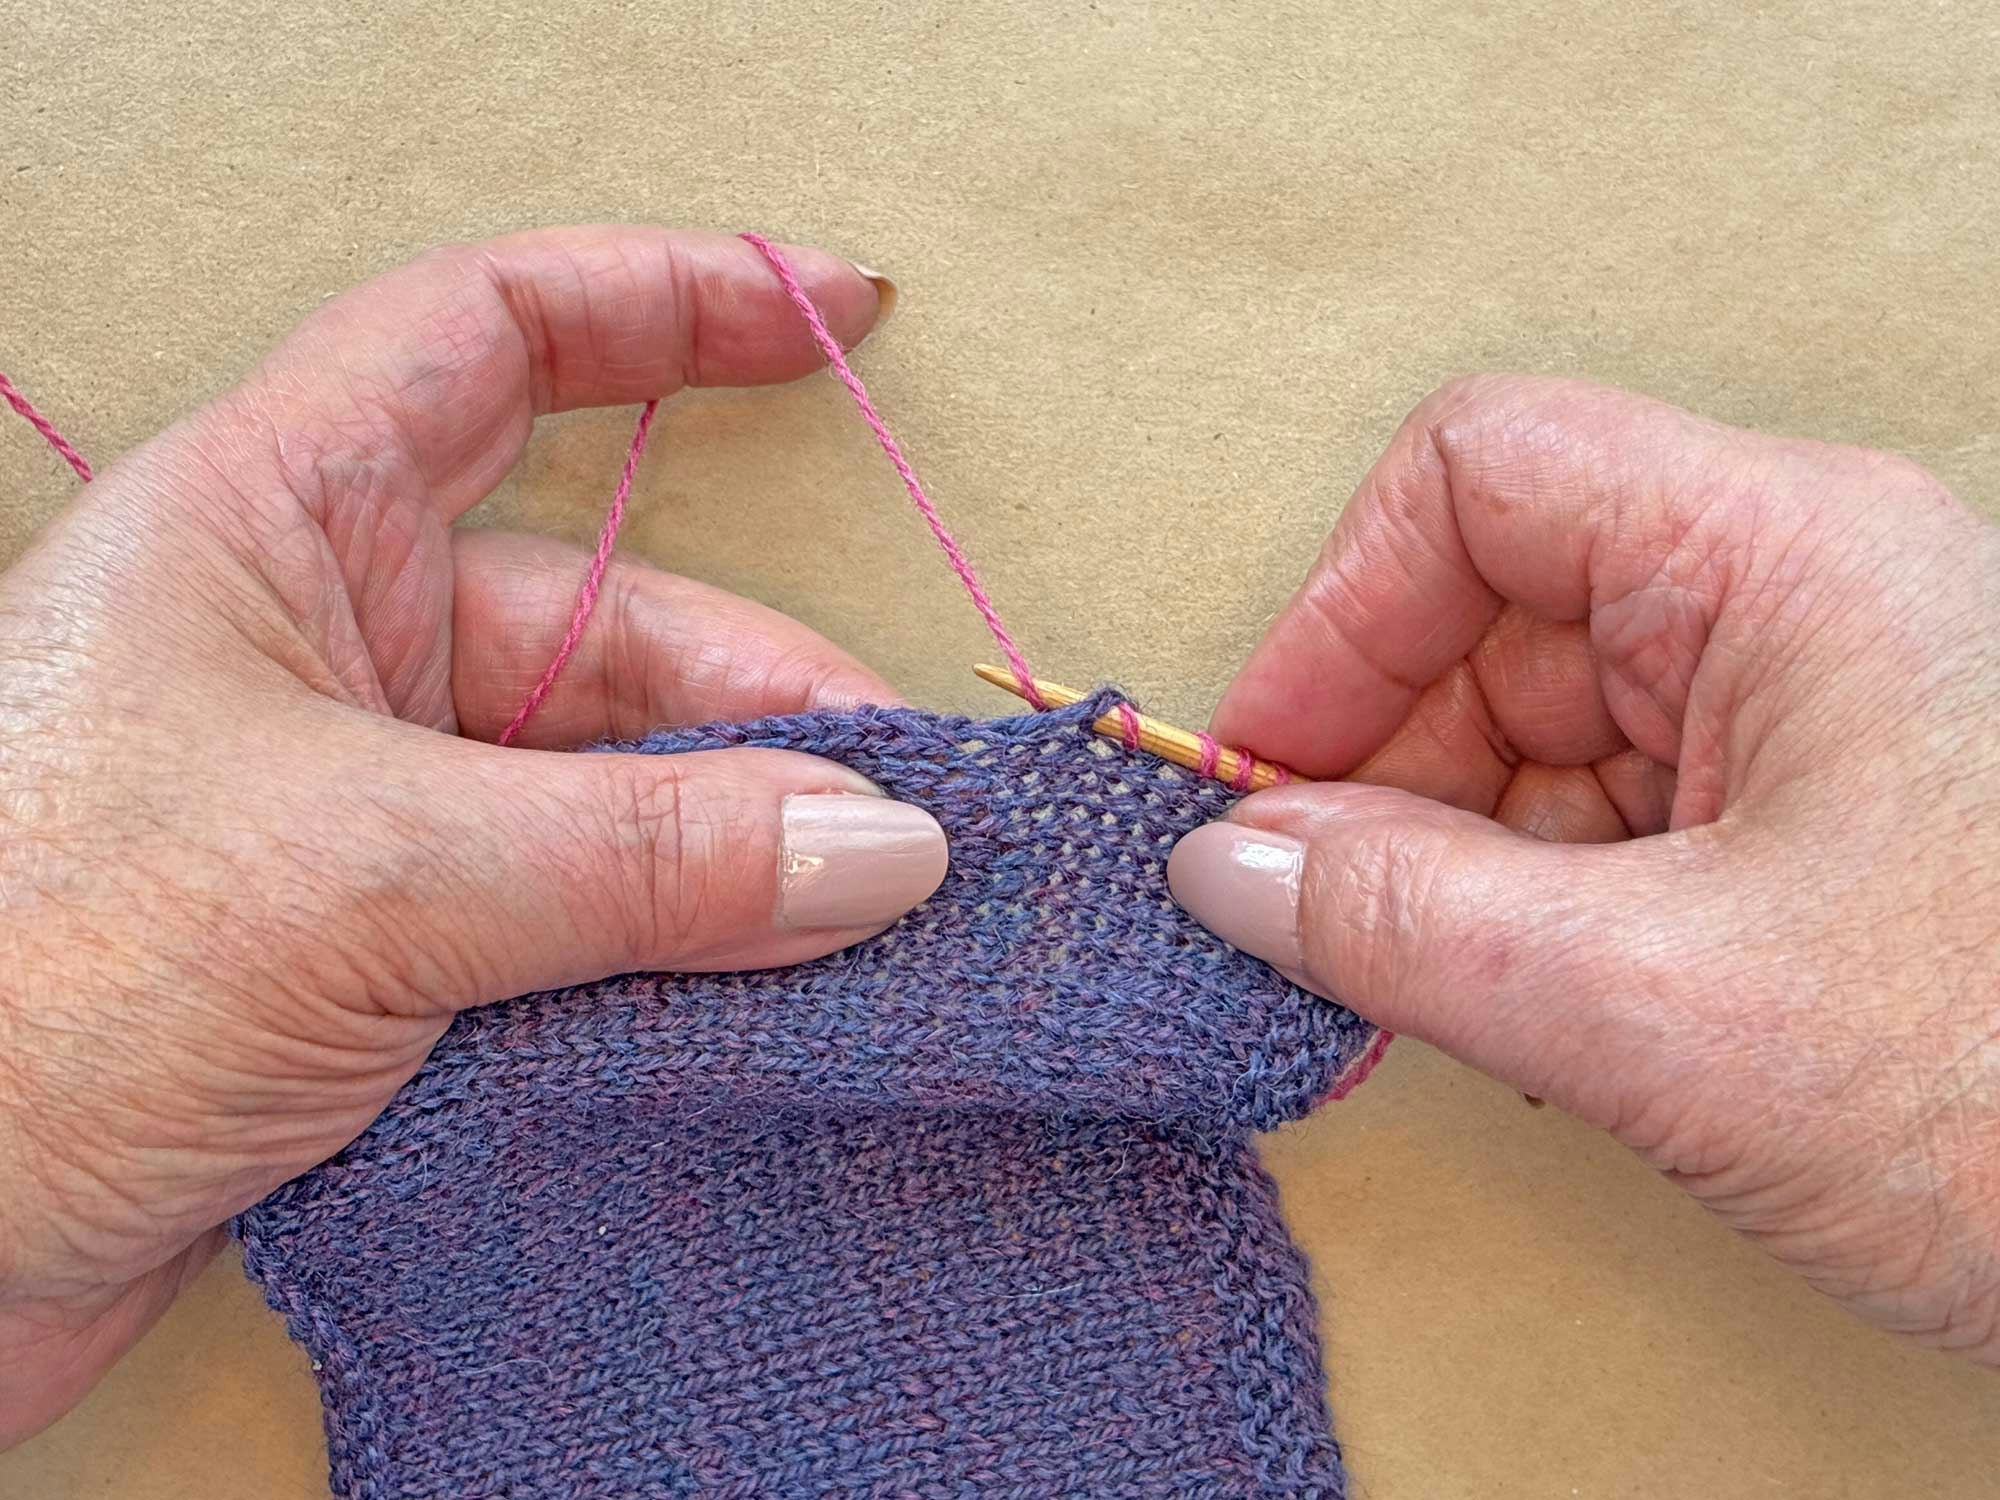
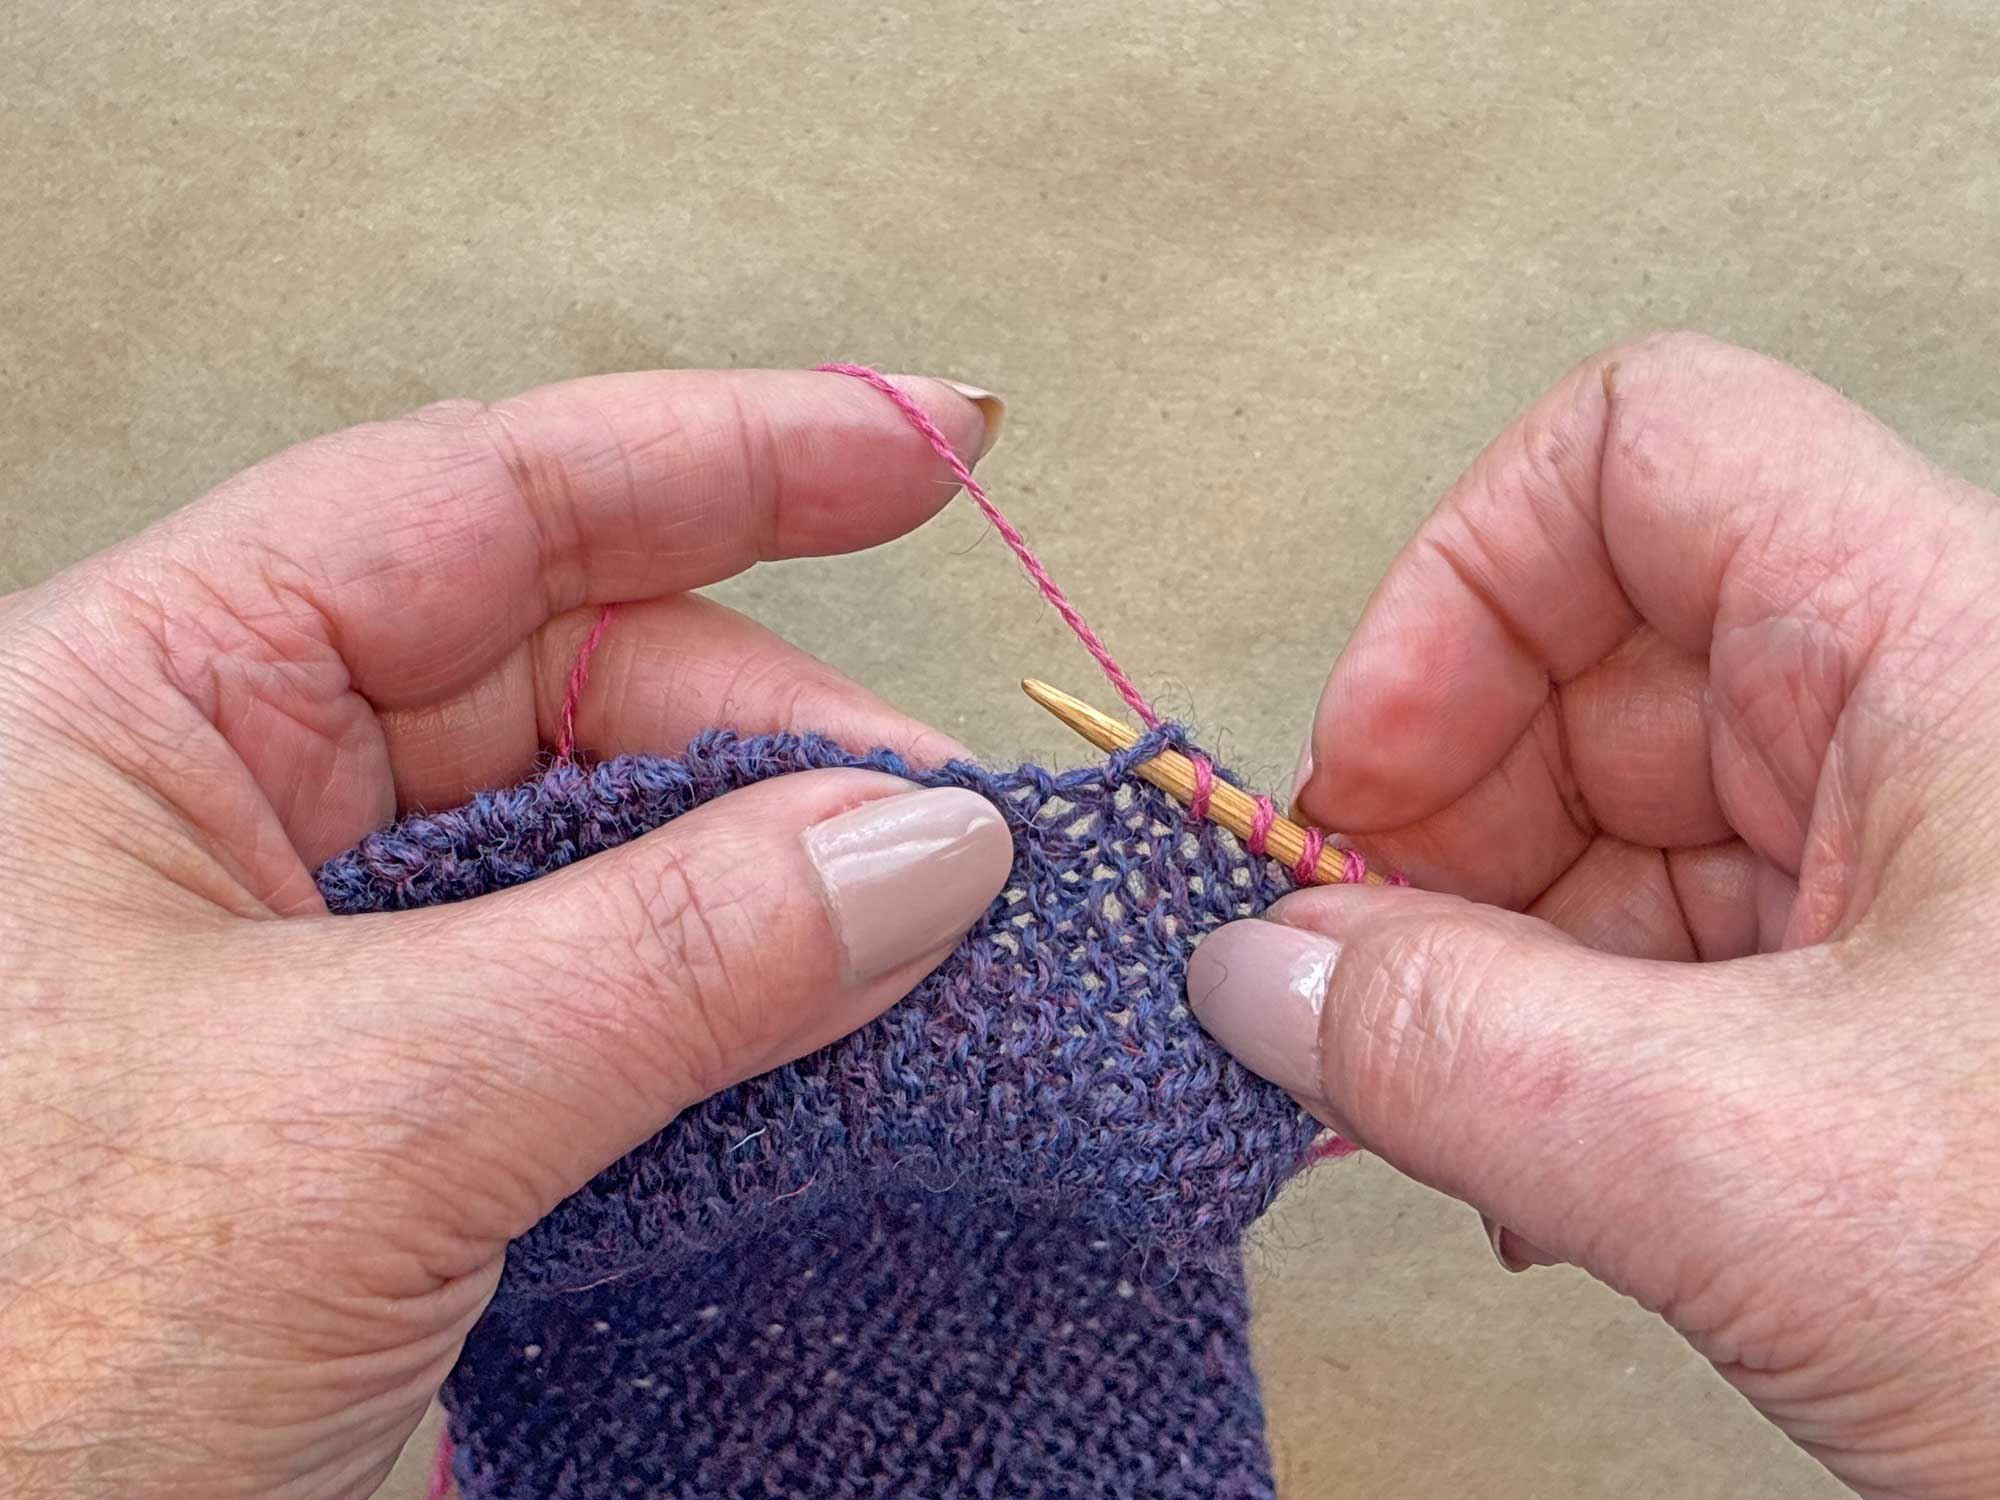
Slip Knitwise With Yarn in Back
When you slip the first stitch knitwise with yarn in back, a small bump or “knot” is created at the end of each garter ridge. With a little stretch, you can clearly see a gap just beneath each bump. You will pick up and knit your new stitches in these gaps.
Click to open in full-screen mode and to learn more.
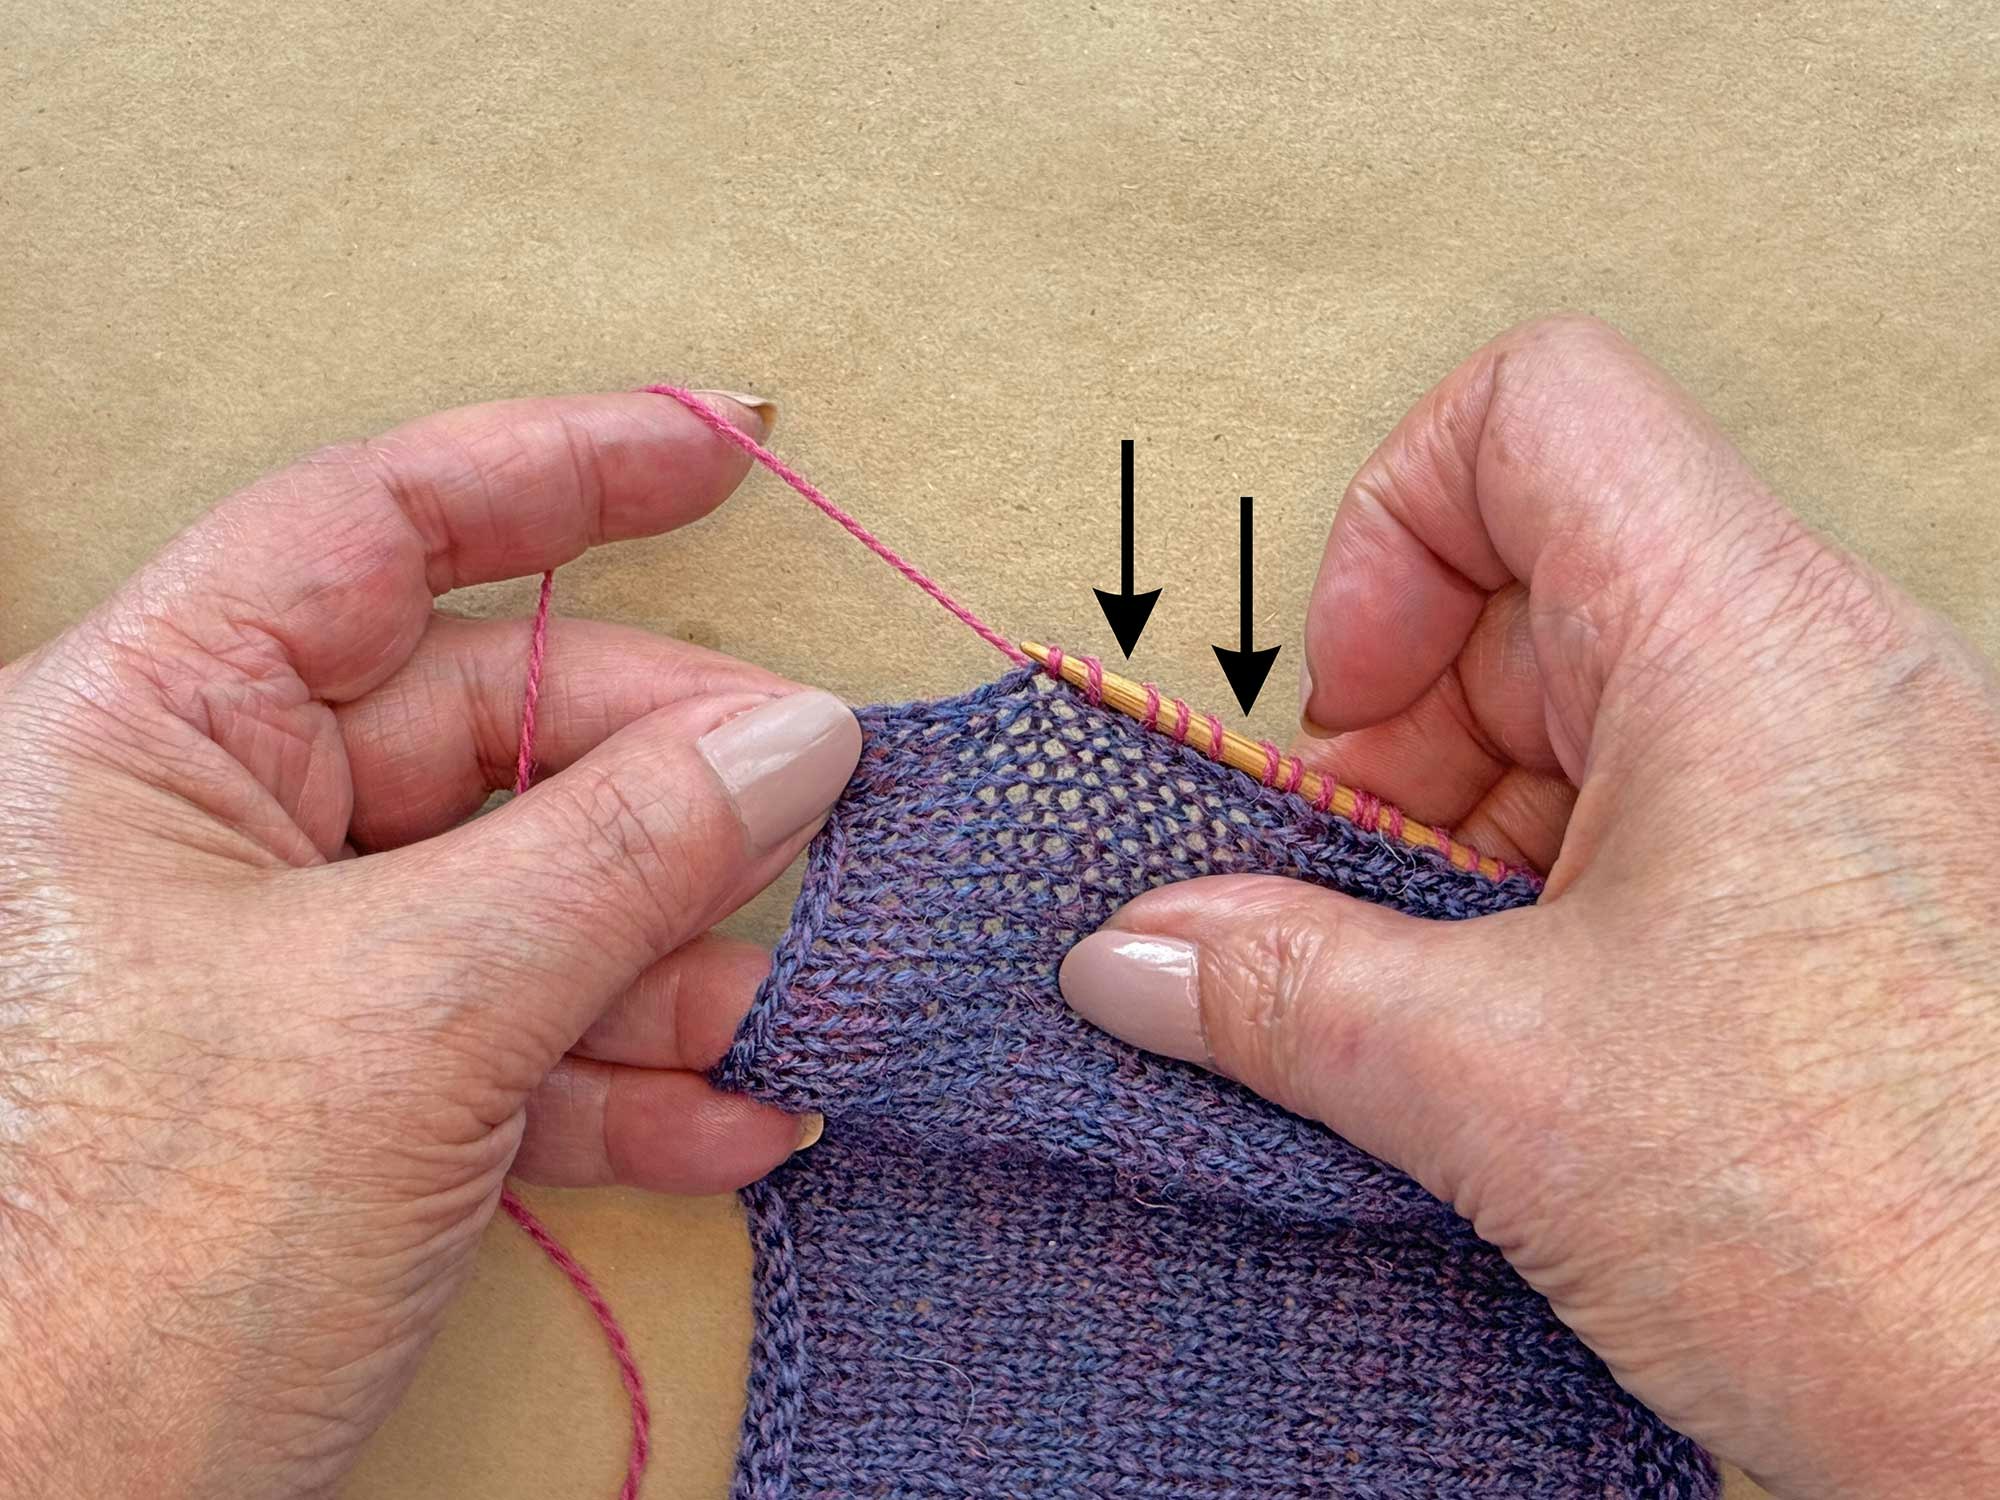
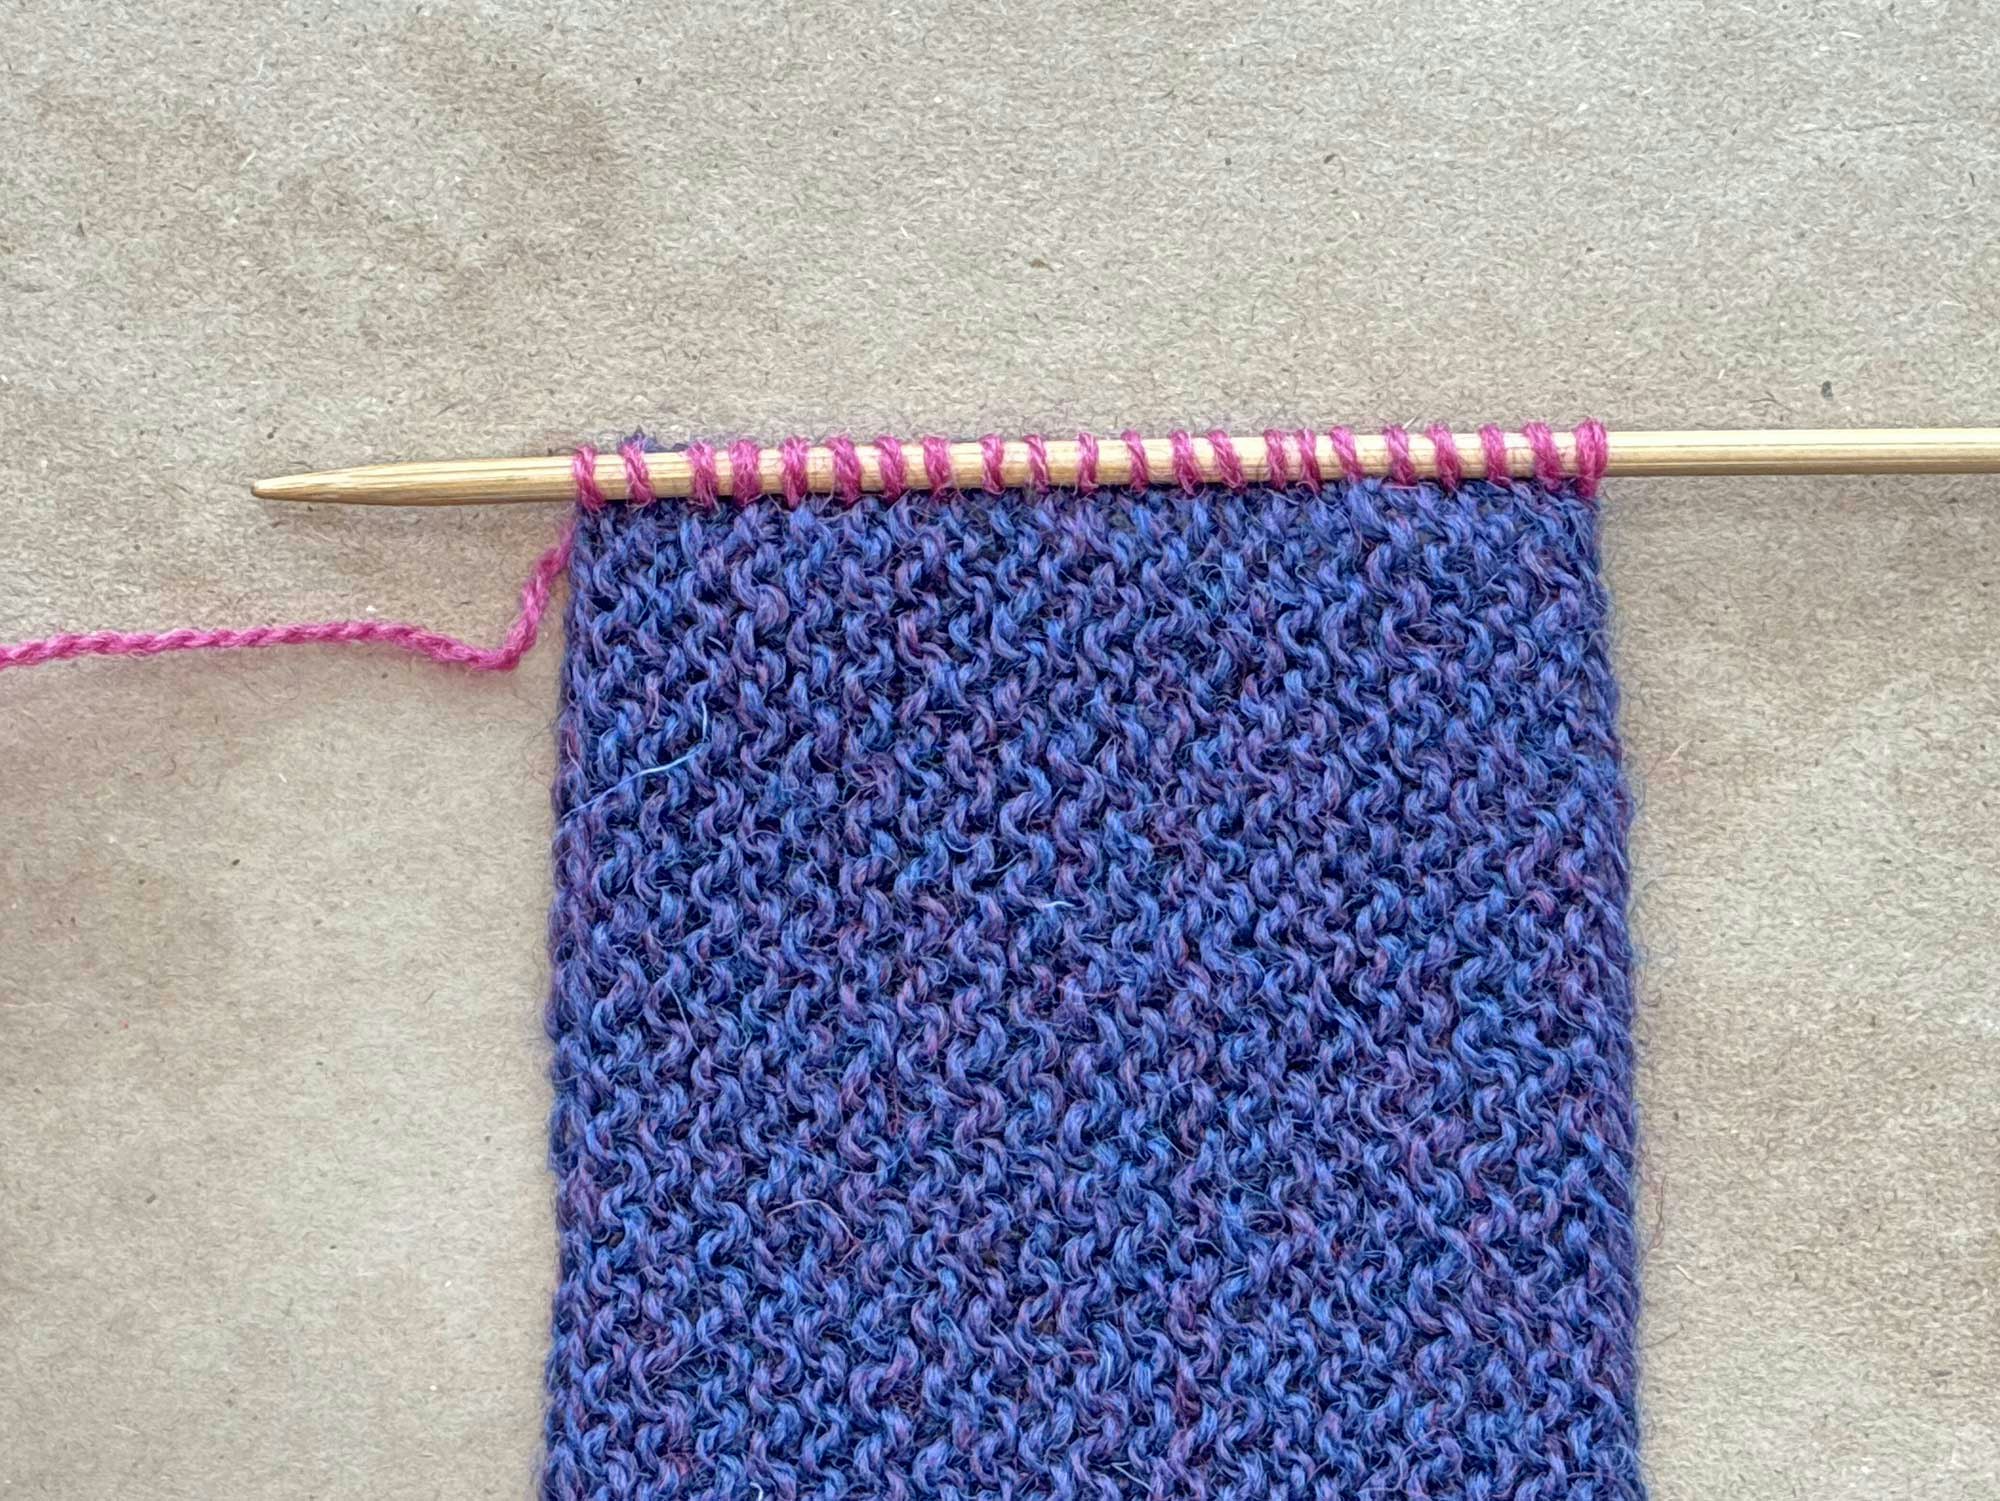
Slip Purlwise With Yarn in Front
When you slip the first stitch purlwise with yarn in front, you create a tidy chain of slipped stitches which sits squarely along the edge of the piece. Meg’s pattern suggests you pick up and knit stitches under just the far half of those edge stitches, not under both legs. The nearer half of the edge stitches will form a neat little rope at the base of the picked-up stitches.
Click to open in full-screen mode and to learn more.
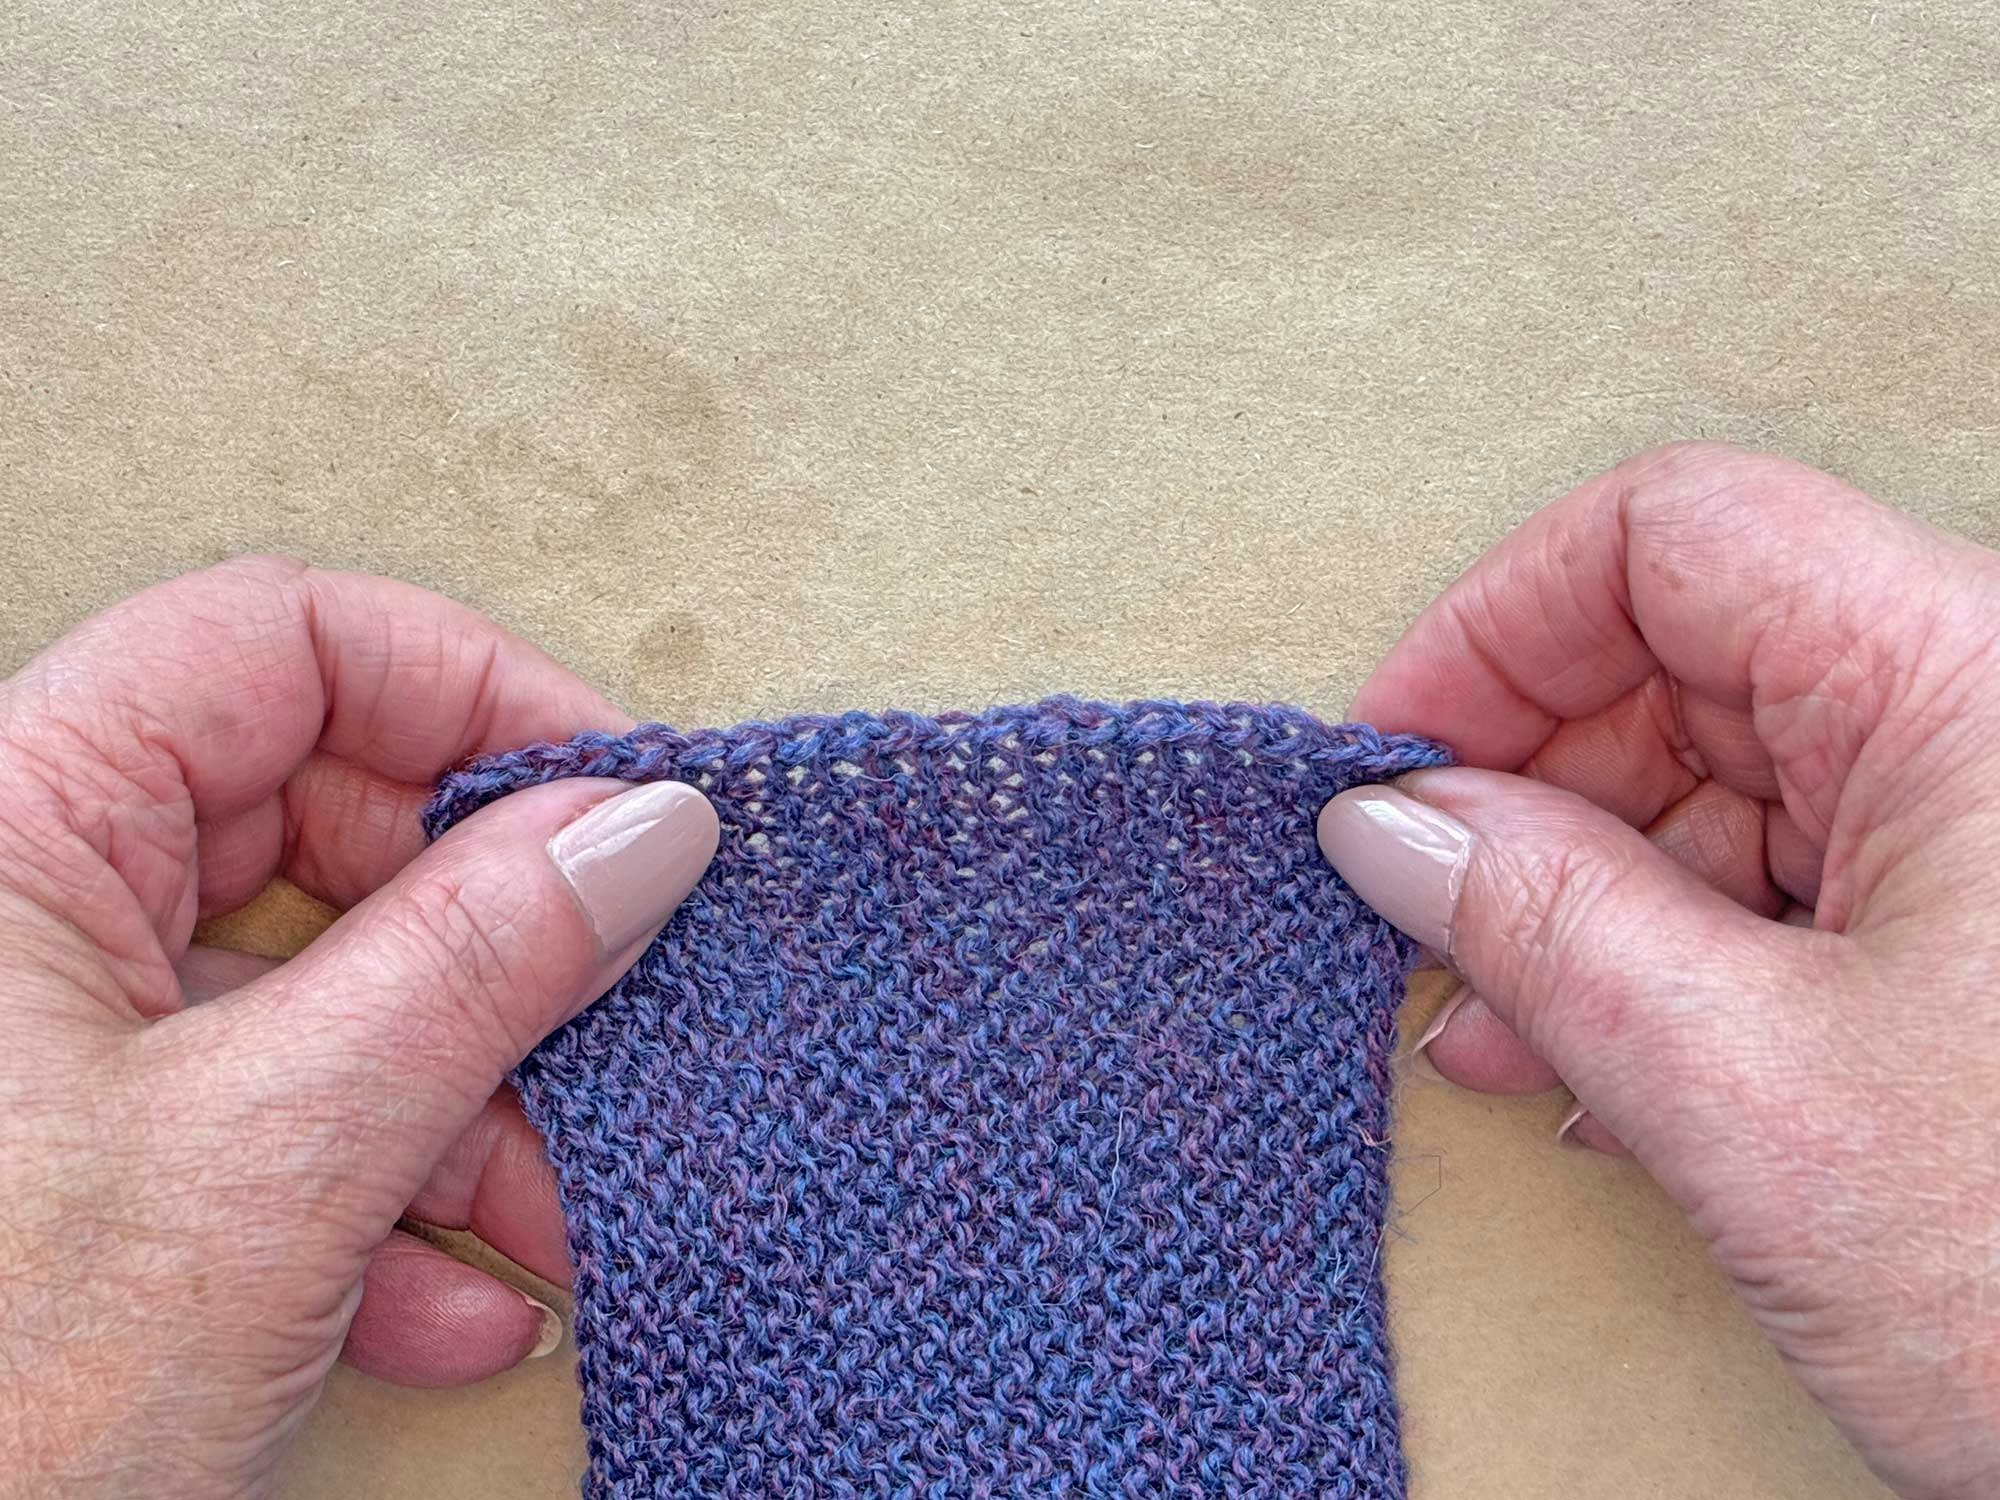
Does it Really Make a Difference?
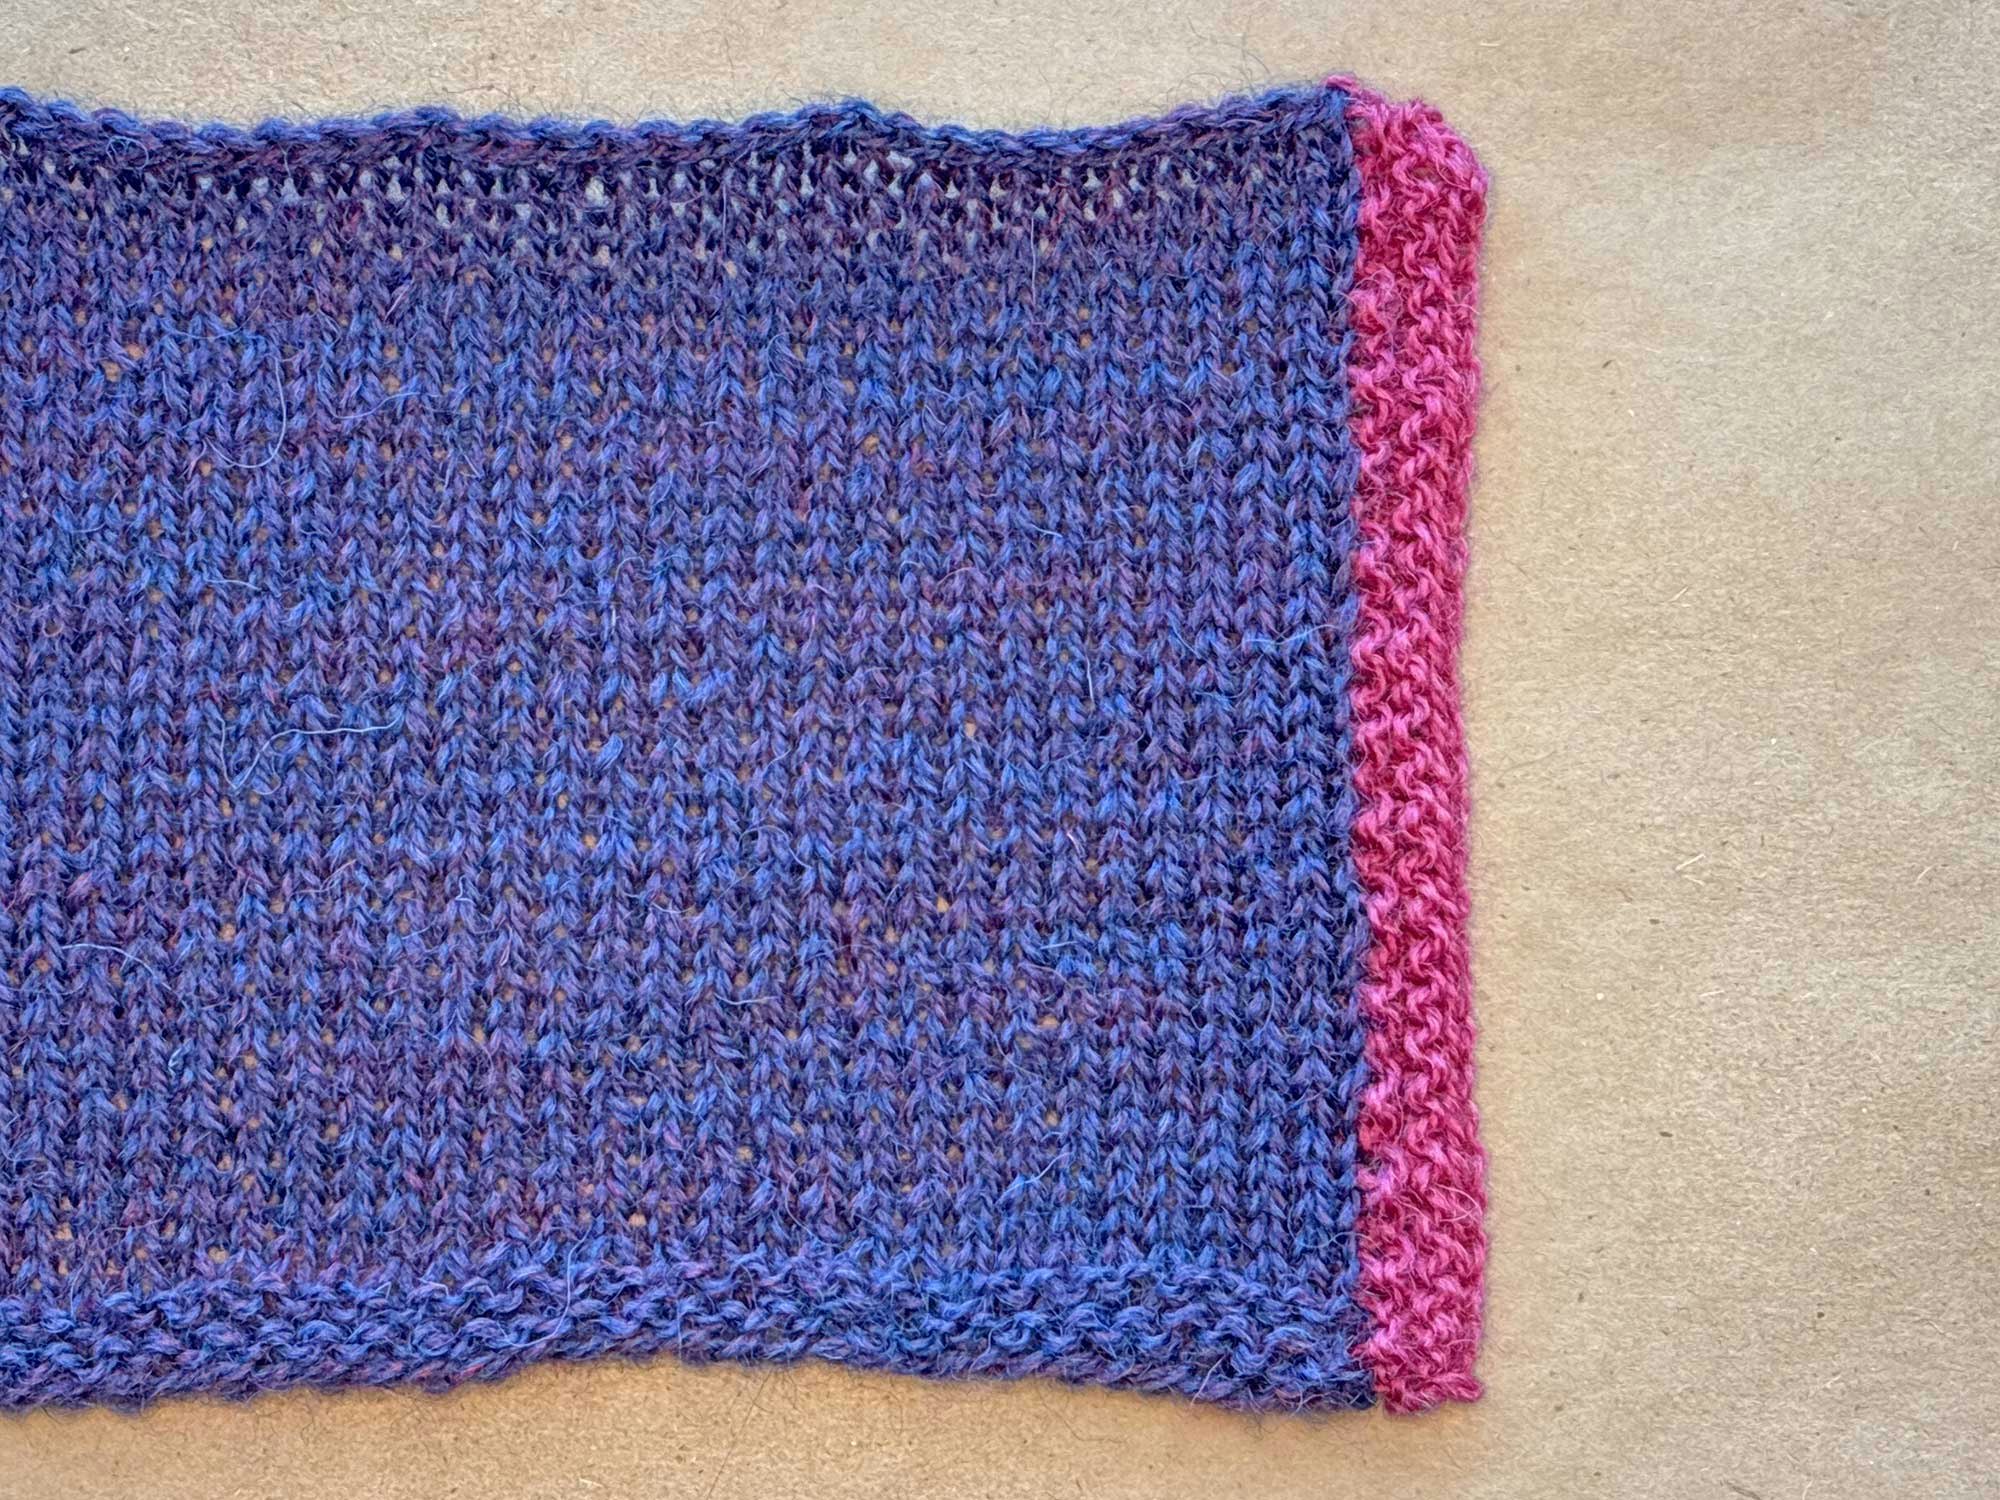
Let’s take a close look at both versions side-by-side with the lace edging added.
 On the left, the garter stitch selvedge was slipped knitwise with yarn in back. On the right, it was slipped purlwise with yarn in front.
The difference is subtle. Where the garter stitch edge was slipped purlwise with yarn in front, there is a sharper line between the body of the piece and the edging.
As is often the case with knitting, you can choose the technique you prefer. Whatever you choose, you’ll be happiest with your finished project if you pick up and knit stitches evenly and consistently.
Resources