Subscriber Exclusive
Colorwork Tension Trouble: 3 Common Problems and How to Fix Them
The Rustic Colorwork Hat is the perfect project to test your tension.
The Rustic Colorwork Hat is the perfect project to test your tension. <a href="https://farmfiberknits.com/colorwork-tension-trouble-3-common-problems-and-how-to-fix-them/">Continue reading.</a>
https://farmfiberknits.com/cdn-cgi/image/format=auto/https://www.datocms-assets.com/101500/1721398178-new-header-colorwork.jpg?auto=format&w=900
Do you struggle with bubbles and puckers or uneven stranding with some colorwork projects? First of all, don’t judge the work until it is wet blocked; it might all come out in the wash. But what should you do if something is still amiss after it’s washed and dried?
The new issue of Farm & Fiber Knits has a great range of stranded motifs, ranging from a few rows of stranded stitches between color blocks to an intricately patterned cowl. The combination of different motifs, projects, and personal knitting styles means that the solution to colorwork-tension problems can be nuanced. Sometimes we need to take a closer look at our fabric to determine how to adjust.
Using the chart from Jen Geigley's Rustic Colorwork Hat in the new issue, I created a set of swatches with various tension issues and one with my “ideal” tension. If you are trying to fine-tune your colorwork knitting, here are some go-to tips for smoothing puckers, relaxing dense fabric, and fixing uneven stitches and strands!
Problem: Puckers.
Tip to Try: Spread the stitches out.
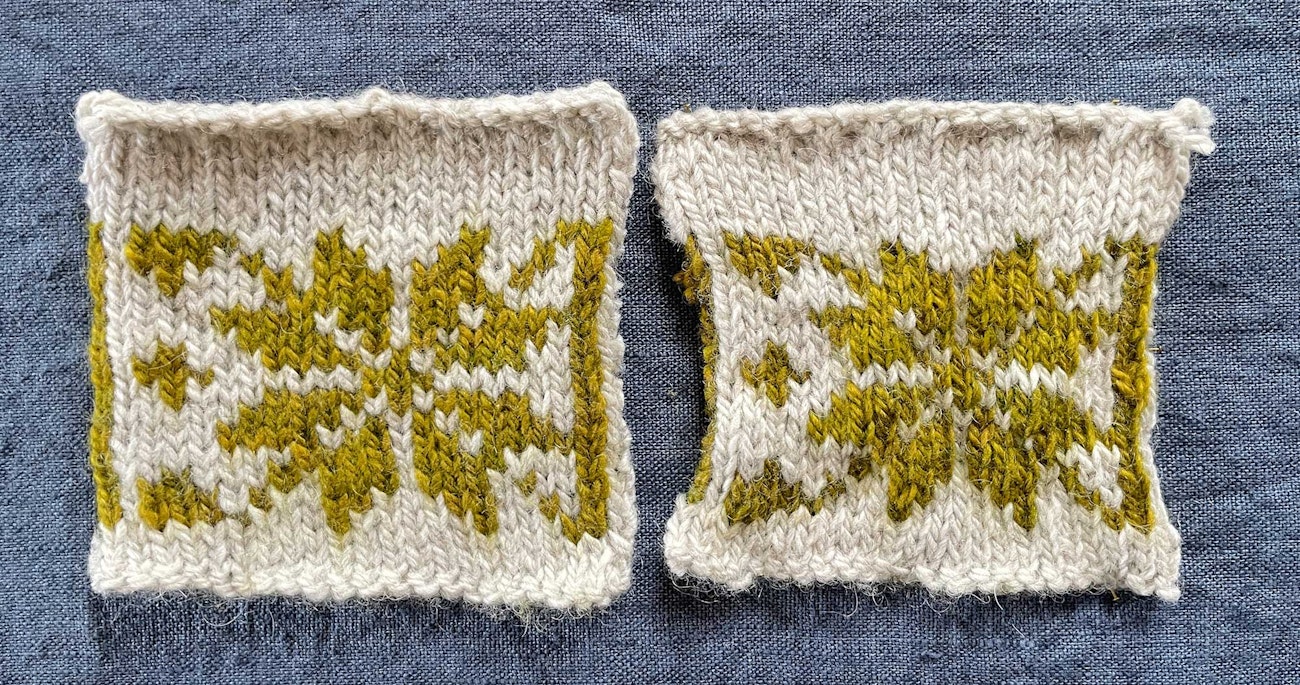 Left: Kate's ideal swatch. Right: The surface of the blocked fabric is wavy and undulates.
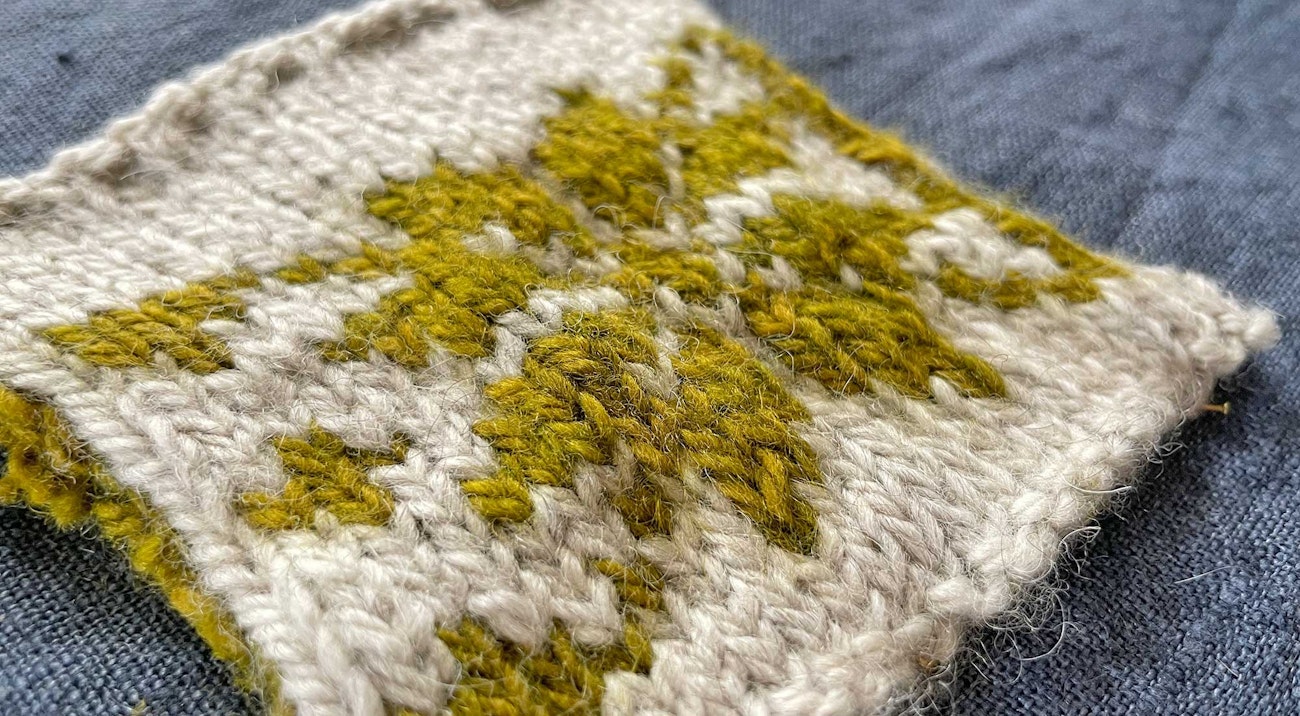 After blocking, the surface still does not lie flat.
As we knit, it usually doesn’t really matter how we manage the new stitches being loaded onto our right-hand needle.** Some of us pull them farther to the right after every stitch or two to allow space for more stitches. Alternatively, some knitters keep the stitches close to the right needle point, not pulling them farther along the right needle as frequently. This changes the distance between the newly formed stitches as they sit on the right needle. Most of the time, this doesn’t affect our gauge too much.
For colorwork knitting—also called stranded knitting—the spacing between the new stitches on the right needle can dramatically impact the length and even the consistency of the stranding on the back of the work. The length of the strand or “float” is determined by how spread out or scrunched up the stitches are on the right needle. So, by spacing our new stitches, we change the strands—easy!
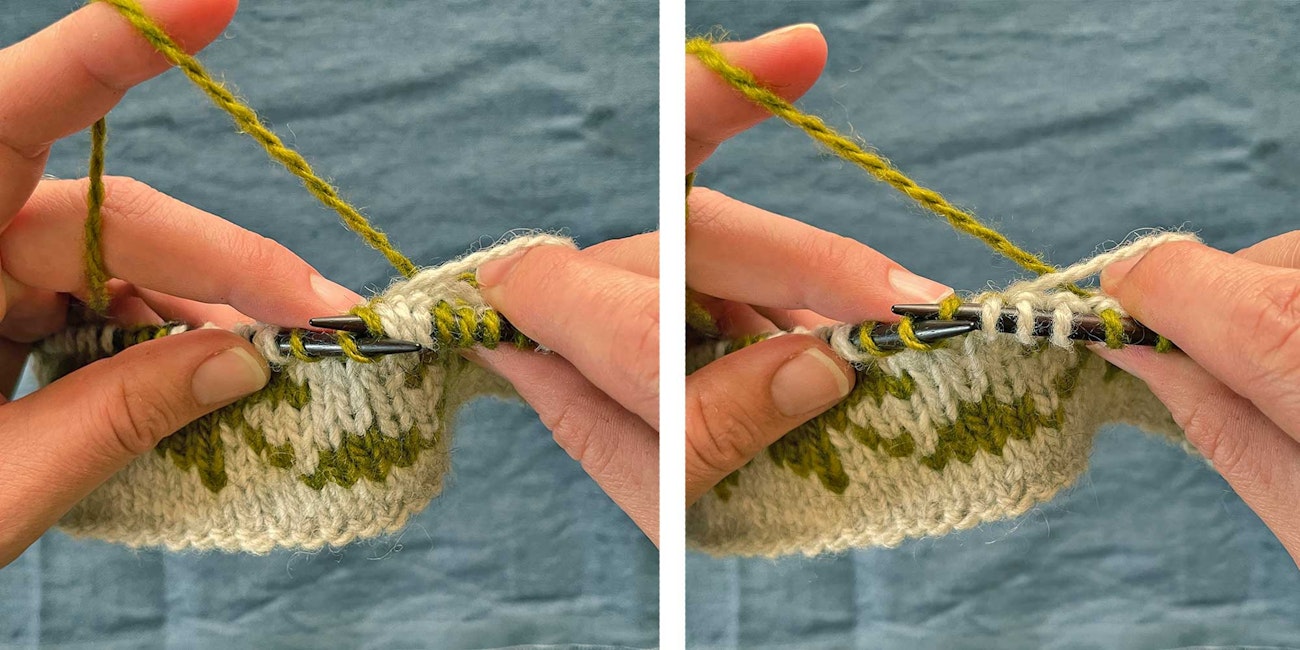 Tip: Spread stitches on the right needle to create strands/floats that are the correct length. This applies when the working yarns are held both in the left or right hands as well.
The goal is to keep the stitches sitting on the right needle at about the same stitch-per-inch gauge you want for the finished fabric. I often keep my stranding just a touch looser to ensure an elastic fabric with a pucker-free finish.
SUBSCRIBER EXCLUSIVE
Do you struggle with bubbles and puckers or uneven stranding with some colorwork projects? First of all, don’t judge the work until it is wet blocked; it might all come out in the wash. But what should you do if something is still amiss after it’s washed and dried?
The new issue of Farm & Fiber Knits has a great range of stranded motifs, ranging from a few rows of stranded stitches between color blocks to an intricately patterned cowl. The combination of different motifs, projects, and personal knitting styles means that the solution to colorwork-tension problems can be nuanced. Sometimes we need to take a closer look at our fabric to determine how to adjust.
Using the chart from Jen Geigley's Rustic Colorwork Hat in the new issue, I created a set of swatches with various tension issues and one with my “ideal” tension. If you are trying to fine-tune your colorwork knitting, here are some go-to tips for smoothing puckers, relaxing dense fabric, and fixing uneven stitches and strands!
Problem: Puckers.
Tip to Try: Spread the stitches out.
 Left: Kate's ideal swatch. Right: The surface of the blocked fabric is wavy and undulates.
 After blocking, the surface still does not lie flat.
As we knit, it usually doesn’t really matter how we manage the new stitches being loaded onto our right-hand needle.** Some of us pull them farther to the right after every stitch or two to allow space for more stitches. Alternatively, some knitters keep the stitches close to the right needle point, not pulling them farther along the right needle as frequently. This changes the distance between the newly formed stitches as they sit on the right needle. Most of the time, this doesn’t affect our gauge too much.
For colorwork knitting—also called stranded knitting—the spacing between the new stitches on the right needle can dramatically impact the length and even the consistency of the stranding on the back of the work. The length of the strand or “float” is determined by how spread out or scrunched up the stitches are on the right needle. So, by spacing our new stitches, we change the strands—easy!
 Tip: Spread stitches on the right needle to create strands/floats that are the correct length. This applies when the working yarns are held both in the left or right hands as well.
The goal is to keep the stitches sitting on the right needle at about the same stitch-per-inch gauge you want for the finished fabric. I often keep my stranding just a touch looser to ensure an elastic fabric with a pucker-free finish.[PAYWALL]
Problem: Dense fabric and gauge change.
Tip to Try: Change your needle size.
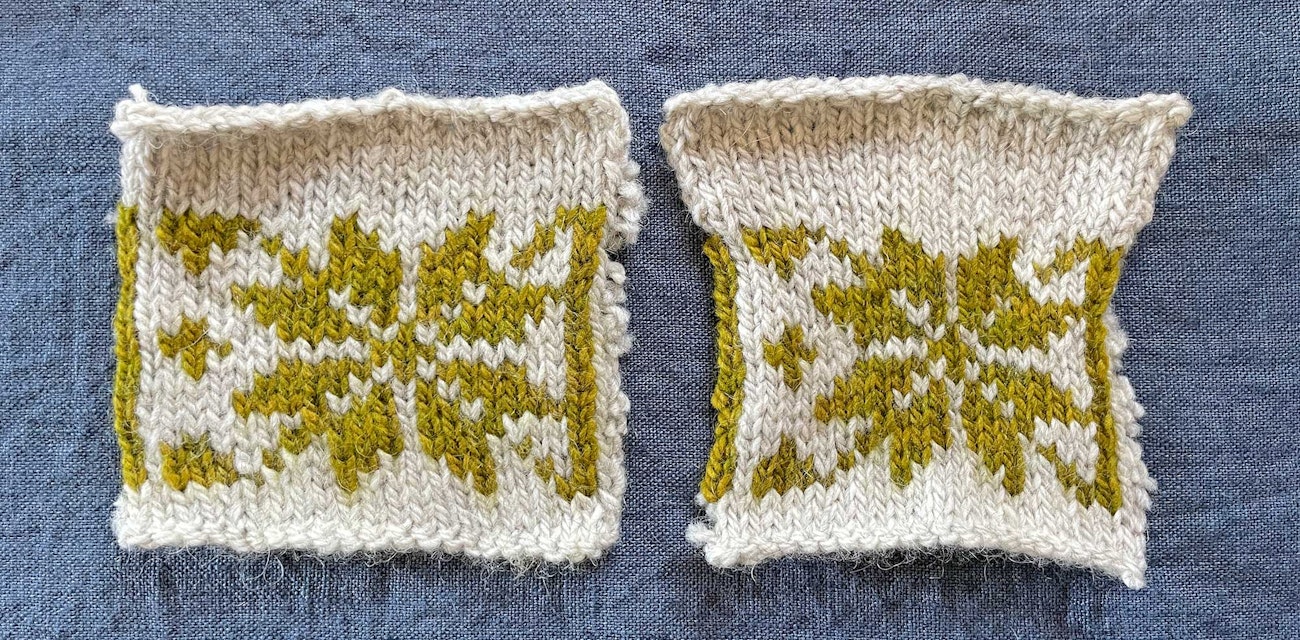 Left: Kate's ideal swatch again. Right: A colorwork fabric that is denser than desired, but the stitches and strands are consistent between yarns/colors. Note how the stockinette at the top flares out.
Most knitters have a gauge difference between everyday stockinette and stranded knitting, and much of the time, the colorwork gauge is tighter. Understanding your personal gauge change if you have one becomes important for projects such as the Rustic Colorwork Hat. If the colorwork section that sits on the widest part of the head is much tighter than the brim or top of the head, the hat might be uncomfortable to wear.
If your gauge is tight in colorwork compared to stockinette stitch, the first thing to do is check out how your stitches sit on the right needle as above. If you still have a tighter fabric in the colorwork section, try going up a needle size or two. Then, you can go back to the original needle size when the colorwork band is done.
Not sure if you have a gauge change in colorwork knitting? No problem! You can work a swatch in the round. You could cast on for several repeats of the colorwork motif in the round (all right-side rows), follow it with some stockinette, and then compare the gauge of each after wet finishing.
Or you could make a small project such as the Rustic Colorwork Hat as an experiment—it serves as a nice, big swatch, providing more accurate information in the form of a useful object! If you get through the colorwork section and decide that you should have gone up a needle, simply ravel and reknit that section.
Problem: Uneven fabric, inconsistent floats.
Tip to Try: Change how you hold the yarn or mindfully adjust your tension.
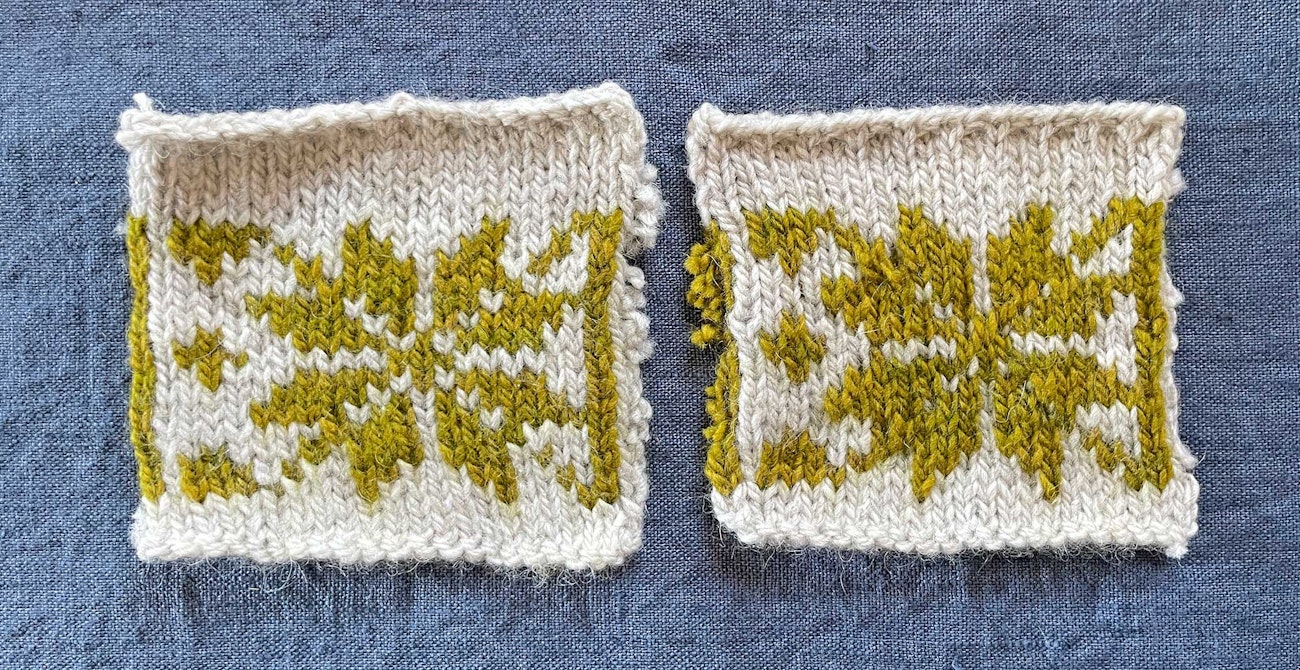 Left: Kate's ideal swatch. Right: Uneven fabric and strands; the green stitches are loose and white stitches are tight. That tension difference has a huge impact on the motif!
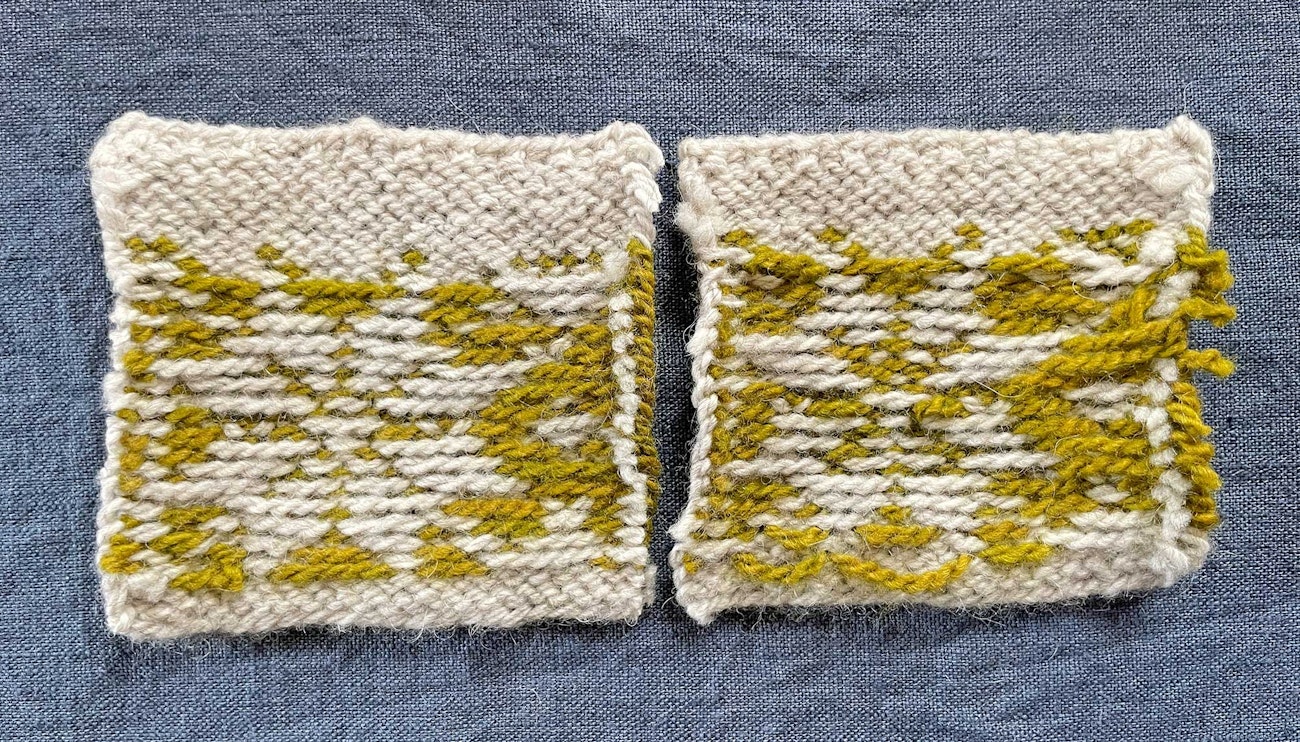 The wrong sides of the swatches show a big difference as well.
If you’ve tried the two tips above and still have fabric that puckers in some places but not others, has some strands that are tighter/looser than the rest, and might even have some elements of the design that get lost, it’s time to take a closer look at your knitting style.
I usually see knitters have these problems when the tension between the two (or more) yarns is inconsistent. This might be because the two yarns have different gauges or elasticities or—more likely—how the yarns are held. I’m a knitter who prefers to hold one color in each hand for speedy colorwork knitting (see the top image), but I had to knit a few projects that way before I had equal tension on the yarn held in each hand. Here’s why:
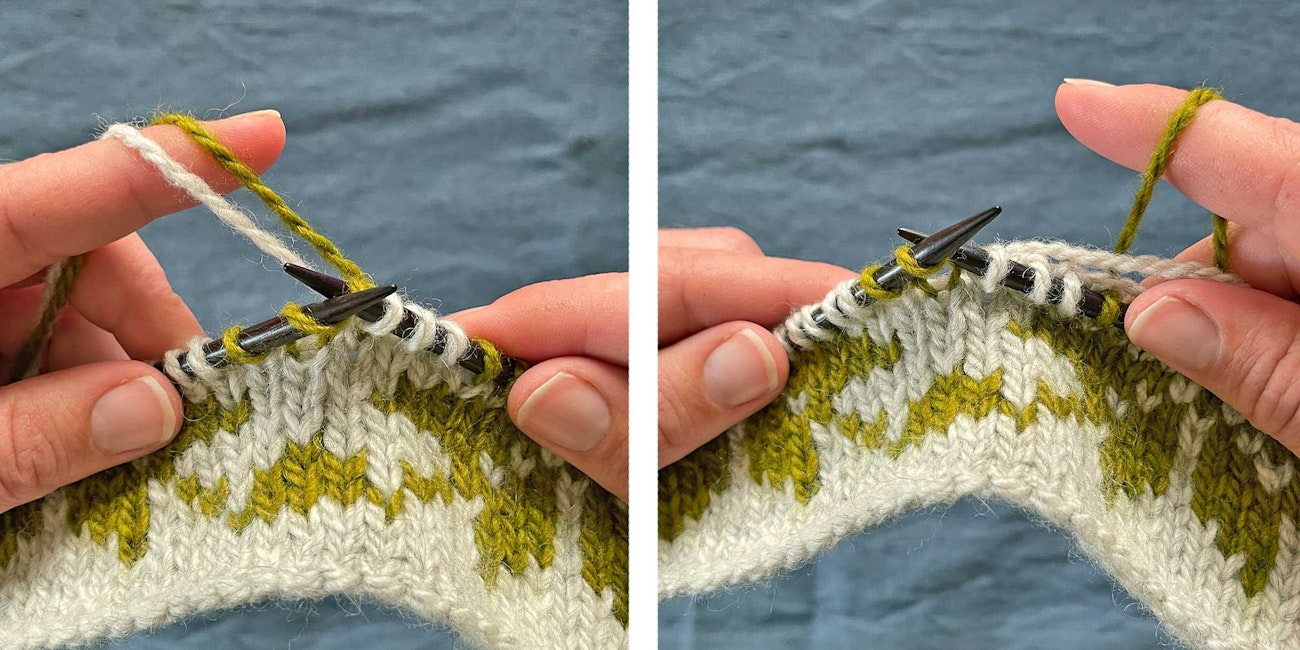 Yarn held in the left hand pulls the new stitch to the left; yarn held in the right hand pulls the new stitch to the right. There isn't a right or wrong way to hold the yarns, but they are different.
When the working yarn is held in the left hand, it is tensioning left, away from the direction the stitch is moving when it is transferred to the right needle. When the working yarn is held in the right hand, it tensions the new stitch in the same direction it is moving onto the right needle. I find that the yarn held in my right hand is inclined to create tighter stitches. In fact, when knitting traditional Norwegian Selbu mittens, I hold both yarns in my right hand to create a very dense fabric like the old mittens I’ve visited in museums. You can hold both yarns in the left hand, both yarns in the right, or one in each. There is no consistent rule about what works best because we are all so different. See what works best for you.
If you are having any tension problems, I suggest getting more practice and taking a close look at your work. Be curious and enjoy the wooly journey!
—Kate
** These instructions assume your typical knitting and purling works stitches from the left needle onto the right needle. Reverse the instructions if you prefer to work stitches from right to left, or you are using a knitting back backwards technique. (Yes, you can also knit colorwork back backwards—it’s a thing!)
Kate Larson, editor of Spin Off, teaches handspinning around the country, has published knitting patterns in books and magazines, and spends as many hours as life allows in the barn with her beloved flock of Border Leicesters.
 Left: Kate's ideal swatch. Right: The surface of the blocked fabric is wavy and undulates.
  After blocking, the surface still does not lie flat.
  Tip: Spread stitches on the right needle to create strands/floats that are the correct length. This applies when the working yarns are held both in the left or right hands as well.

 Left: Kate's ideal swatch again. Right: A colorwork fabric that is denser than desired, but the stitches and strands are consistent between yarns/colors. Note how the stockinette at the top flares out.
  Left: Kate's ideal swatch. Right: Uneven fabric and strands; the green stitches are loose and white stitches are tight. That tension difference has a huge impact on the motif!
  The wrong sides of the swatches show a big difference as well.
 Yarn held in the left hand pulls the new stitch to the left; yarn held in the right hand pulls the new stitch to the right. There isn't a right or wrong way to hold the yarns, but they are different.